Saturday, 15 December 2018

3d printed lathe carriage lock.


A while back I saw this  lathe accessory on thingiverse and downloaded the files, I printed the bits a few days ago and have been fiddling with it on and off, press fitting captive nuts inside it and tapping sections.

It's a handy little thing for 2 purposes, it has a profile that allows it to be clamped to the lathe ways and also has a clampable hole that accepts something that is 8mm diameter. So it's very handy for holding a dial test indicator (as above) for example to make a very precise last cut or other accurate positional stuff. 

It's also pretty useful with just an 8mm piece of steel bar in it and the bar can be set to a fixed position and it acts as a stop guide for the carriage. Useful for quickly making repeat passes/cuts on a job to the exact same point. I like the idea and it works ok, I might do a redesign at some point as I think making the assembly a bit wider would be useful and would increase its clamping force making it adhere to the ways more securely.

Thursday, 13 December 2018

Scheduling an Observation on SatNOGS

The other week, as part of my presentation at INSPACE 3 I included a few slides about how simple it is to schedule an observation on a satNOGS ground station. If you build and deploy your own  ground station as part of the network you can then schedule any station on the network, but until you do that you can't and that means that this aspect of satNOGS operation remains unseen. I realised at this talk that people might feel that this part of operating a SatNOGS station is complex! Let me reassure you it isn't! All scheduling happens via the satnogs.org website and lets walk through how it works!

So when you log in you get sent to your dashboard  landing on your stations page. Above we see my station number 217. There's some basic info about the station and a map. As a side note if I am here to check a previous observation on my station I can hit the blue "view all" button and it takes me to a list of observations. However we are going to scroll down and set up a new future observation.
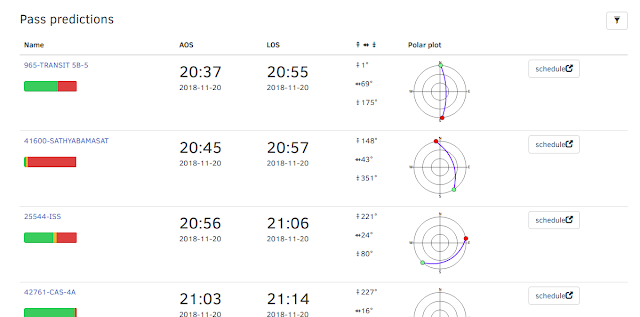
So if we scroll down on our station landing page we get to a box which is continually populated with the future passes of satellites above our station. It has on the left the name of the satellite and a meter which tells us the historic success of satNOGS stations being able to get a good observation of the satellite (this gives a kind of health status of the satellite). Next we see the time frame of the pass then some details about the elevation. Finally a small plot of the pass with the centre of the cross hair representing the position of our ground station, basically the satellite will pass from the green end of the line towards the red. The last object on the right is a schedule button to begin to arrange an observation of that satellite on that pass. However lets just quickly have a look at another useful thing!
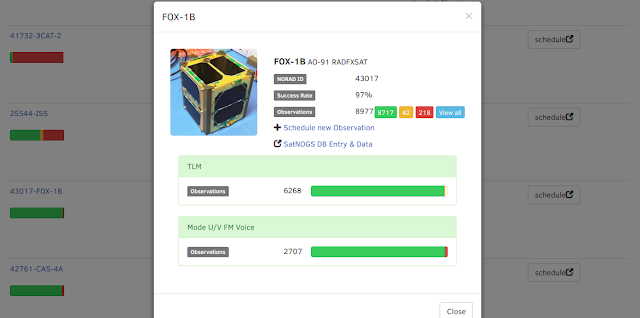
Back on the left hand side you might notice that each of the satellite names is actually a link. There are so many satellites out there and on the SatNOGS database it's unlikely you will know them all by name! So if you click on the link you get a pop up with an overview of the satellite. For example, above I clicked on the Fox 1B name and it shows me that it is a 1 unit cubesat and that it has a pretty good record of being successfully observed
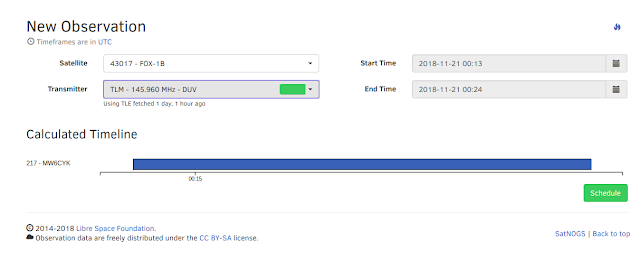
Next, we have closed that popup, and we have clicked the schedule button to set up a new observation of the Fox 1B satellite. We are sent to this page (above) which has details of the satellite and the pass and also a drop down list of the possible transmitters we can schedule to observe. This is important as some satellites may have numerous types of transmitters or transmission we can try to observe. For example a satellite may have a voice aspect (as in radio operators speaking through the satellite as a kind of satellite repeater) but also might have some data being sent separately as telemetry giving details of the satellites condition. Having made sure to select the transmission we want to observe we then click the green schedule button.
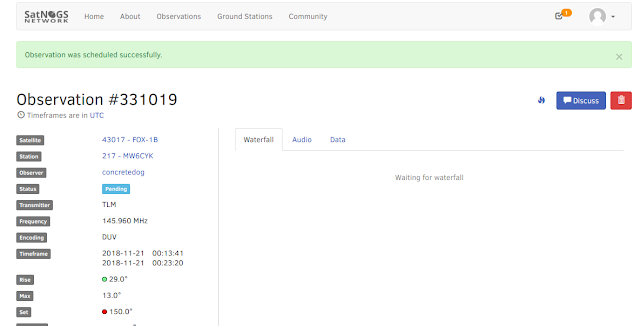
So we now have an upcoming observation setup and we see the observations individual page. This page (unless for some reason we  decide to delete it) will remain as a unique page for this observation. After our station has performed the scheduled observation it should populate with the observation data. So if we come back to this page after the observation we should see an image of the waterfall. 
Like so! Above is an observation page after the observation and we land on the waterfall tab, if we click the audio tab we should be rewarded with an audio file of the observation which we can play in the browser or download.


We can also click through to the data tab, now this may be empty dependant on the type of observation and  if we were looking for data or not,  but if we did receive some data it should be on this tab. 

So above we see some telemetry frame data from the FOX 1 A satellite, for this particular satellite we could copy this data and run it through the free software made available on the satellites mission website and decode what the data means. However for an increasing number of satellites the satNOGS network is set up to decode the data and present it in this tab. This could take different forms but for example if we observe the NOAA satellites we may return to a decoded image in this tab!

So that's it in a nutshell, I mentioned earlier that on the first dashboard landing page we might click the "view all" observations button and that's a handy way to get to all the observations in a list that our station has either completer or has pending.


 I hope that that little walk through is useful and shows just how simple it is to get going once you have your station set up! So join us and you can also get hunting satellites! If you are interested in setting up a satNOGS station there are loads of sources of help, not least the satNOGS area on the libre space foundation community forum.


Monday, 10 December 2018

Ten Minute Tinker! Embossing with 3d prints.


Recently hackaday ran an article where someone had embossed some stuff using a 3d print to act as the embossing stamp... Intrigued I thought I would give it a go.

So it works! I printed the small rocket in PLA with 0.8mm walls and a 50% infill to make it really tough. I stuck it to a bit of scrap ply (would have been better on a thicker block of something more hardwood!) and then clamped it in a small vice to emboss this little notepad.

It's worked well and I'll see how long or if the embossed logo fades out or decompresses over the next few weeks. I think next time I will dig out the arbor press as it would be easier to align and I wouldn't be limited to putting the stamp at the edges of items! It's such good resolution that it actually shows the fine lines in the 3d print, so I should really CNC some aluminium stamps to do this properly!


Monday, 26 November 2018

INSPACE 3, Satnogs, Wales Aerospace and SDR radios


Last week I ran the 3rd event in my INSPACE series of events which have all been hosted by North Wales Technology (INSPACE ONE HERE , INSPACE TWO HERE!). This INSPACE theme was Software Defined Radios (SDR) and the event was split into 2 main sections. I started the evening with a presentation about the Libre Space Foundation (LSF) and in particular the SatNOGS  project which is a global networked system of opensource satellite ground stations. I wanted to tell the story to the INSPACE audience for a couple of reasons. The main reason is I think it is an inspiring story how LSF have bootstrapped a plethora of space technologies, missions and projects in a unique way, not just opensource, but also outside of military and defence development methodologies. The second reason is that I had negotiated some sponsorship from  Aerospace Wales Forum to not only sponsor the INSPACE 3 event with pizza and drinks but also to sponsor a project to deliver the required hardware for a SatNOGs ground station install on one of  Bangor Universities buildings. Its excellent that they supported this project idea and also excellent that they came over to this event and support it on the night.


And what a night we had, after my talk about LSF and SatNOGs we heard from Richard who works for Glyndwr Innovations who told us about the varied payload development projects there are at the St Asaph Optical cluster and also about the high end engineering systems that are hosted within Glyndwr's campus. He went on to describe a recent program Glyndwr innovations ran to deliver some small funding grants to local startups for research and or engineering/validation with the funding coming from the UK space agency. It's excellent to see that there are organisations working to bringing this funding into North Wales to develop the space industry ecosystem here.

After some pizza networking the 2nd half of the evening was in the capable hands of Luke and Chris who hosted and informal workshop getting everyone started with RTL SDR's. These are a cheap USB dongle originally designed for use as digital TV receivers for laptops but they actually contain a very capable software defined radio receiver and as can be used for lots of radio usage (and indeed they underpin the whole of the SatNOGs ecosystem so it maintained the subject for the evening)!.

By the time we had finished everyone who wanted to had installed and got up and running with a SDR dongle on a variety of platforms, of course windows and linux and mac but also a few people used them with their android phones etc. We had some attempts at trying to hear a satellite outside the venue but with not perhaps the best antenna or indeed the best passes of satellites success was limited, we did mange to get an ADSB setup running and see some aeroplane transponders... but the cold quickly beat us back inside!


We finished the evening with Chris transmitting some SSTV Images... including the North Wales Tech logo and the attendees capturing and decoding the images, fabulous fun and I want to extend massive thanks to Chris and Luke for their help in running what I feel was another successful INSPACE event! Finally massive thanks also need to go to Carwyn from NW Tech who puts in astonishing amounts of work for the cause, Arleosi Pontio Innovation for once again hosting the event in their co-work space and Wales Aerospace Forum for the aforementioned sponsorship.


Thursday, 8 November 2018

New venture! Podcasting!


So yes... I've considered setting up a podcast for years and never got round to it... but just decided to go for it! Here is the first test episode with random sung intro music and a 5 minute anecdote... hopefully more to come! All suggestions and comments welcome.

Wednesday, 7 November 2018

Quick make! Making boxes useful with a 3d printer!


Aaaaaages ago my dad gave me a huge box full of these small 'raaco' stacking boxes that had been chucked out of a business somewhere and had been given to him. I have used a few on my workbench loose and they make really useful project boxes for holding small parts as I am working on something, or I've used them to sort electronic components when doing batch assembly. They also stack well but they don't have lid and I don't have a case for them which limits their use a bit. I keep contemplating making a larger box for them to stack into but then I had this little idea to 3d print some lids with holes for some cord, I can now fasten and transport them whilst keeping every thing safely inside making them much more useful! Using a bit of cord and a drawstring toggle means that the lid can close different multiples of boxes.

Also whilst I am here.. someone got in touch the other week and asked to make a donation to me as he had been inspired by a post on here! That was very cool and humbling, so in case anyone else wants to buy me a coffee I've added a donate button to the blog! Feel free to use it!

Tuesday, 30 October 2018

Proud to have a rocket article in Hackspace magazine!


Rather wonderfully a couple of months this back the mighty Hackspace magazine visited Midland Rocketry Clubs "Midland Sky" event and flew a couple of their own model rockets and met and chatted with everyone there. They explained they wanted to run some rocketry features in an upcoming issue... And indeed the have in issue 12. It's not all rockets but there's a good chunk of rocket articles in there covering model rocket 101, interviews with the mighty thrust vectoring Joe Barnard/BPS space and also an article by yours truly! Based on a document I wrote up off the back of my rocket design workshops my article takes people through designing and simulating a rocket using the Openrocket software. Really pleased to be included and hope it helps bring a few new people to look at rocketry. You can download a free pdf of Hackspace magazine via the website but can also order a print copy which also can be found in all good magazine stockists! 


Saturday, 27 October 2018

Scratch built 29mm rocket anchor point (Or why do things the easy way!)


So I am working on a design for a minimum diameter 29mm rocket air-frame which means that the motor directly fits into the complete internal diameter of the rocket with no space around it. Common practice with larger rockets is to use an internal motor mount tube mounted in some centring rings, the fore centring ring usually is where the builder will place an eyelet or lifting bolt that will be the anchor for the recovery system/parachutes etc.

Obviously without this centring ring you need to come up with a different solution. I want to have the option of using the motor ejection charge so needed something that gases can expand through but also it needs to be strong. I recently picked up 2nd hand an aluminium anchor point for a larger 38mm air-frame off another rocket builder via Facebook and a discussion followed about how with a smooth metal outer finish it was difficult to get them to adhere/epoxy to the inside of an air-frame. So my idea was to make a similar anchor point to receive a lifting eye but to make it slightly under size and then knurl it to be a better fit and to maximise the keying surface for when it is epoxied into the air frame tube. The knurling is pretty badly done and definitely not decorative but it is definitely going to allow a small amount of epoxy to create the strong bond needed.

So why the "Why do things the easy way" bit... Well... after a search of the material/scrap pile I didn't have a piece of aluminium of large enough diameter to make this component. So I have done it the hard way! I started of making a very crude casting from some melted aluminium! With my very dinky little kiln!


I then poured the melt into a crude mould made from some of my diy casting sand (silica play sand and bentonite clay sourced from cat litter (unused... I a NOT that much of a cheapskate!)


The crude casting was then chucked up in the lathe (the cheap 2nd hand mini lathe I bought a while back) and turned to round.


I then realised none of the suitable boring tools I had actually fit in the toolpost of the mini lathe so I parted off the job and transferred it to my old faithful perfecto lathe and bored out the inside. Its somehow more pleasing when you really have made something from scratch!

Friday, 5 October 2018

One Mix Yoga review


For many years I have been a fan of ultraportables... I owned (and still have) an original eee pc701 when they came out and I have owned a litany of PDA devices over the years and regular readers (a select group of amazing individuals) may recall I recently got Linux up and running on my linx1010b tablet.

I'd lusted a lot after a gpd pocket when they were released last year but the lack of an SD slot put me off. I loved the form factor however and so when I saw the very similar One Mix Yoga which has an SD slot I decided to take the plunge. The final push was that it had a backlit keyboard... Great for a bit of late night browsing or indeed checking a rocket simulation in a tent at a rocketry meet!

It's a great machine, preconfigured with Windows 10 it boots quickly and everything works. Mine had a stuck pixel on arrival but I am happy to report that it unstuck with some usage and has resolved. I'm not really a windows fan but do reluctantly use it occasionally so the plan was to try and get it dual booting windows and some flavour of Linux.

I'd seen that a few things weren't working for people under Linux on the one mix yoga, most noticeably sound, so I was prepared for some issues. I was also prepared after my linx 1010 Linux experiences to have some screen orientation issues to resolve. I tried 3 or 4 Ubuntu flavoured distros before settling on the most recent version of Ubuntu Mate. Having tried lubuntu, xubuntu and vanilla Ubuntu I was struggling to get screen resolution correct (it's a pretty hi Res screen) and was therefore delighted to click the Hidpi option in Ubuntu mate which instantly resolved all my tiny icon/font/cursor issues. I found that I could make my screen orientation settings persist under Ubuntu mate and I quickly resolved and got screen brightness controls working. WiFi works and hibernation is good... But I still haven't found time to resolve getting sound working or indeed swapping the axis on the touchscreen... An issue I faced and resolved on the linx 1010b.

So it's now setup to dual boot and this works well.. giving me an ultraportable linux box for doing bits of work on the go but I can also boot into windblows if I require a bit of surfing/media/youtube.


It is amazingly portable... Fits into a cargo pants pocket easily and is pretty lightweight. Despite having a slightly slower processor than the gpd pocket I find it's fine for some libreoffice on the go or for a bit of Openrocket rocket design work. The reversible hinged screen makes it an excellent ereader and flipping the screen disables the keyboard which means you don't disturb your reading with random keypresses.

Friday, 28 September 2018

Open Source Cubesat Workshop 2018

As Red would say "YES"!

I had the pleasure of travelling to this years OSCW that was once again hosted at an European Space Agency campus ESAC the European Space Astronomy Centre just outside Madrid, Spain. I equally had the pleasure of staying with the Libre Space Foundation crew including some of the core team but also some of the global contributors.

There is so much I could say about the talks and the event but I don't know how to summarise it all! So instead I will just say that the quality of presentation was great and it really is re affirming and heartening to see so many communities forming around the opensource development of space technologies. Staying with and meeting some of the wider Librespace contributors makes one feel part of something amazing and left me invigorated and wanting to contribute more. Here follows a small photo dump!


Friday, 21 September 2018

ODR Flight!... and lots of learning!

'

Photo credit Peter Barrett

I had the absolute pleasure of attending the Midland Sky event held by the midland rocketry club last weekend where I finally got to fly the Open Development Rocket or ODR. In simulation I had it flying to 2900 feet and in real life it was a little heavier I felt it was going to fly a little lower as I thought the simulated design was at its optimal weight.. however I was incorrect and indeed it went higher! It shot off the pad on its 38mm Cesaroni H152 2 grain motor and went into a near perfect vertical flight up to an apogee of 3255'.


Photo credit Peter Barrett


It nosed over and deployed the drogue chute at apogee correctly and began to descend, it was supposed to fall back to 500' and then the quantum altimeter was supposed to blow the other charge to release the main chute. What actually happened was that at around 2000' it deployed the main early, I can tell it happened here from the change in steepness of the decent rate on the graph output from the altimeter. I don't think that this was when it fired the main ejection charge but rather the nosecone was shaken off and it dragged the main out. It does highlight an area of ODR that needs a redesign - the upper section of ODR that contains the main chute is really too small. In an effort to get some space back I had reduced the shoulder of the nosecone and despite it being reasonably tight it came loose. Interestingly I had left the motor ejection charge in place and on its longest delay setting and based off the openrocket simulation I believe that this would have fired around the same time that the early main deployment occurred. Perhaps it produced a bit of an extra kick/movement to help dislodge the nosecone?

 The altimeter data states that the charge channels were fired at the right altitudes so I believe everything worked... but that I needed to design a bigger upper section and then have a better longer nosecone shoulder and retention. All good learning.

So the result... well.. A LOOOOOONG walk! ODR drifted a long way with its 152 second long flight and I did fear that it was lost! That said we had a good line on where it lay and a fantastic recovery operation was performed. All round nice chap Stuart Livings jumped in my scruffy car and we drove as far as we could towards ODR. Parking in a farmyard we then set out on foot to get ourselves on the line/bearing we thought ODR lay on, Stuart then used his drone with FPV to fly out on the line and he quickly discovered ODR apparently having made a good landing some distance ahead. He kept the drone locked above ODR and that gave me an easy heading to walk to and recover her! Many thanks Stuart. So I definitely take some learning from this but overall I am pretty pleased, I definitely feel that this was a positive failure mode, meaning that if you are going to fail its better to fail where the results are a slower descent rather than a faster descent that's close by!

Sunday, 2 September 2018

ODR Rocket deployment groundtests

Got a bit of time this afternoon to do some ground tests of the deployment system of the ODR opensource rocket. Its my first dual deploy rocket so I'm learning lots as I go. One thing I definitely discovered is its quite tight in the upper section where I plan to fly the main chute...I was using some quite thick webbing as the recovery bridle which I might replace with some thinner kevlar to try and reduce the volume of stuff I need to cram in there... failing that I could always reverse the roles of the sections and fly the main chute in the lower section of the airframe. For more details of the ODR opensource rocket check out this post.

Monday, 13 August 2018

Making Drogue and Main parachutes... aka SEWING IS HARD!


I'm trying to get the ODR rocket build finished and am finalising the electronics bay for dual deployment where it will blow a charge and release a tiny drogue parachute at apogee and then deploy another charge to push out the main chute at a predetermined altitude on the way down.

I wanted to use a crossform parachute after all the work I put in working through the maths of them (paper and calculator spreadsheet here) and as ever I wanted to make them myself...although 5 hours in on the sewing machine I began to question why!

For my Panta Rhei flight I used a reasonably heavy ripstop nylon and I cut it with a soldering iron which gave an excellent edge that required no hemming, however this wasn't suitable for the job for the ODR rocket. I needed to consider packed sizes of the chutes as ODR is a slim rocket with not masses of room in either section for the recovery system. As such I wanted to use some very lightweight ripstop nylon I have as it would pack much smaller, however I also needed it to be strong as with dual deployment the main chute is deployed when the broken air-frame is falling at some speed. I designed the drogue to bring the falling air-frame down at about 20 meters per second as I had seen similar fall rates on online that others had used. The main is designed to further drop the descent rate to around 5 meters per second which is quite a large change in velocity so it needs to be pretty strong.

I decided that I would cut the nylon traditionally and then stitch a double hem to add strength to all the edges. I first used baking paper to cut an over size pattern and then cut the rectangle sections and pinned the hems. This was essentially the same process for the tiny drogue and for the main. I made 2 rectangles and then pinned and stitched them together to form the cross. The sewing machine I borrowed of my daughter is an excellent albeit small machine and it didn't have the clout to stitch through the 2mm nylon cord I was using for shroud lines so they are hand stitched onto the drogue. For the main chute I wanted to reinforce the area that the shroud lines attached to on the chute and attached some small squares of ripstop into each corner, this took ages to do as I hemmed the squares first and then attached them but it should hopefully increase the chances of the chute surviving deployment!


If I had access to a more capable machine and also had more room in the air-frame and could overbuild the chutes slightly I would definitely consider making the lines continue all the way through the chute to make a very strong version.


I've not quite finished yet and have to fit the shroud lines to the main but I've finished the shroud lines on the drogue chute and am pleased with the way I have worked out to terminate the attachment end. I first measure out the desired length (1.6 times the length of the rectangle side from the calculations which equalled 56cm) and then stitched the lines together. I then individually stitched a matching length loop into the end of each of the 8 shrouds and then I stitched the 8 shrouds together and finally with the aid of a bit of stitching and a few drops of superglue I wrapped all the shroud ends in some thick polyester thread. Very pleased and I will use the same technique with the shrouds on the main.


Finally .. whilst I had my daughters small sewing machine set up I stitched some small Nomex fireproof blankets to protect the parachutes from the deployment charges. I definitely rushed these through and they are rough but functional!..


So there we go, learnt loads and got to grips with the small sewing machine... I could definitely do with continuing a bit of sewing to increase my skill at it!