The other week, as part of my presentation at
INSPACE 3 I included a few slides about how simple it is to schedule an observation on a satNOGS ground station. If you build and deploy your own ground station as part of the network you can then schedule any station on the network, but until you do that you can't and that means that this aspect of satNOGS operation remains unseen. I realised at this talk that people might feel that this part of operating a SatNOGS station is complex! Let me reassure you it isn't! All scheduling happens via the
satnogs.org website and lets walk through how it works!
So when you log in you get sent to your dashboard landing on your stations page. Above we see my station number 217. There's some basic info about the station and a map. As a side note if I am here to check a previous observation on my station I can hit the blue "view all" button and it takes me to a list of observations. However we are going to scroll down and set up a new future observation.
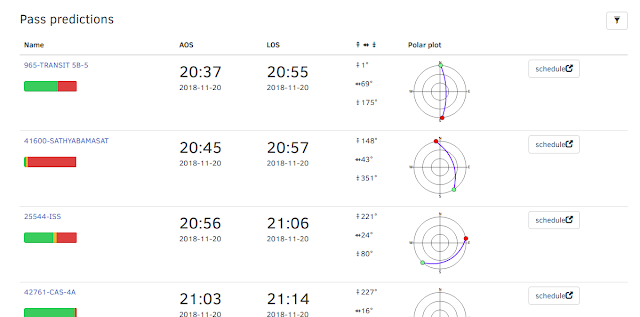
So if we scroll down on our station landing page we get to a box which is continually populated with the future passes of satellites above our station. It has on the left the name of the satellite and a meter which tells us the historic success of satNOGS stations being able to get a good observation of the satellite (this gives a kind of health status of the satellite). Next we see the time frame of the pass then some details about the elevation. Finally a small plot of the pass with the centre of the cross hair representing the position of our ground station, basically the satellite will pass from the green end of the line towards the red. The last object on the right is a schedule button to begin to arrange an observation of that satellite on that pass. However lets just quickly have a look at another useful thing!
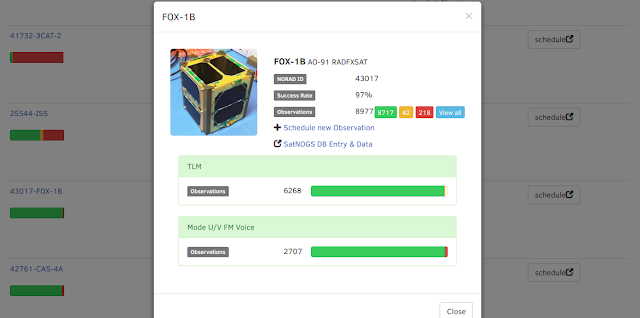
Back on the left hand side you might notice that each of the satellite names is actually a link. There are so many satellites out there and on the SatNOGS database it's unlikely you will know them all by name! So if you click on the link you get a pop up with an overview of the satellite. For example, above I clicked on the Fox 1B name and it shows me that it is a 1 unit cubesat and that it has a pretty good record of being successfully observed
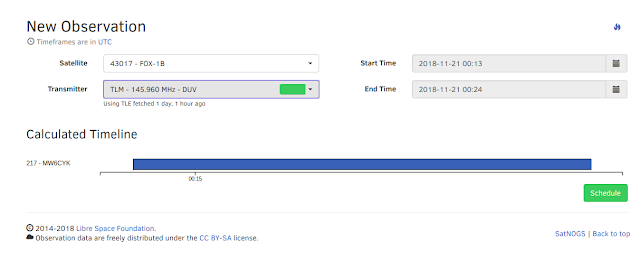
Next, we have closed that popup, and we have clicked the schedule button to set up a new observation of the Fox 1B satellite. We are sent to this page (above) which has details of the satellite and the pass and also a drop down list of the possible transmitters we can schedule to observe. This is important as some satellites may have numerous types of transmitters or transmission we can try to observe. For example a satellite may have a voice aspect (as in radio operators speaking through the satellite as a kind of satellite repeater) but also might have some data being sent separately as telemetry giving details of the satellites condition. Having made sure to select the transmission we want to observe we then click the green schedule button.
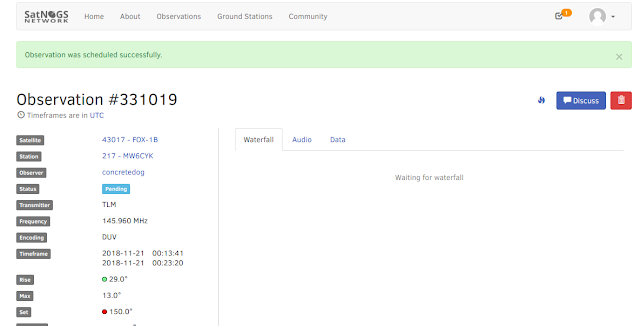
So we now have an upcoming observation setup and we see the observations individual page. This page (unless for some reason we decide to delete it) will remain as a unique page for this observation. After our station has performed the scheduled observation it should populate with the observation data. So if we come back to this page after the observation we should see an image of the waterfall.
Like so! Above is an observation page after the observation and we land on the waterfall tab, if we click the audio tab we should be rewarded with an audio file of the observation which we can play in the browser or download.
We can also click through to the data tab, now this may be empty dependant on the type of observation and if we were looking for data or not, but if we did receive some data it should be on this tab.
So above we see some telemetry frame data from the FOX 1 A satellite, for this particular satellite we could copy this data and run it through the free software made available on the satellites mission website and decode what the data means. However for an increasing number of satellites the satNOGS network is set up to decode the data and present it in this tab. This could take different forms but for example if we observe the NOAA satellites we may return to a decoded image in this tab!
So that's it in a nutshell, I mentioned earlier that on the first dashboard landing page we might click the "view all" observations button and that's a handy way to get to all the observations in a list that our station has either completer or has pending.
I hope that that little walk through is useful and shows just how simple it is to get going once you have your station set up! So join us and you can also get hunting satellites! If you are interested in setting up a satNOGS station there are loads of sources of help, not least the
satNOGS area on the
libre space foundation community forum.


