Saturday 28 December 2019

10 minute make; Magnetic Feet


Last week I was using the variable power supply I built some time ago. It's a great and useful little build that replaced a small trimming resistor on the DC-DC LM296 based board with a 10 turn resistor to increase the resolution. It's stood for ages on top of my old lab supply with a couple of small magnets stuck to the machine screws in the frame and the case of the larger supply. It's stopped it getting knocked off a little but becomes detached easily and I have been meaning to attach the magnets to it in a better way. 


So I quickly knocked up a magnet housing/foot in FreeCAD and chucked a couple on the 3d printer. A quick blob of superglue later and the two magnets pressed in and voila! It now stays in place pretty well just on the two feet, however, I might whip up another pair when I get another spare 10 minutes!


Friday 6 December 2019

Flat Pack Workshop Rocket


I have some work coming up that requires me to take a rocket to a workshop overseas in my luggage so I decided I wanted to try and design a rocket that would break down to be easily packed. I wasn't initially concerned with it being a flying model but wanted it to have all the usual parts to act as a decent workshop prop. In case you are wondering the logo adorning the rocket is for a new non -  profit company I am in the process of setting up called Open Rocketry Research. More on that soon!


The hardest bit to pack is the booster section with the fins so I wanted to make the fins removable. I designed a set of conformal fin rails that have a radius on the back of 27.5mm to match a common 55mm postal tube. I've added escutcheons for M2 nuts and bolts to be able to drill and then mount the fins more securely. I printed the fin slot to accept 3.125mm plywood as I wanted to laser-cut the fins from this material, in the end, it doesn't (for workshop purposes) need the fins bolting in as they are a very nice interference fit into the slot. I'm tempted to fly the thing now, it certainly seems strong enough in terms of fin strength!

The conformal fin rails are superglued to the body tube and I've published the stl file and the FreeCAD file to Thingiverse, its trivial (if you know how) to use FreeCAD to change the dimensions for a longer or shorter fin root length (currently 100mm) or to swap the radius to fit a different tube. Get in touch if you need any help adapting this.


Saturday 5 October 2019

New Sewing Machine! Parachute deployment bag prototyping!


So sadly (and despite replacing the two drive gears for the feed dog mechanism at great effort) the older 80's singer sewing machine we had had some other terminal failures and was beyond economical or technical repair. I'm really lucky to have been long term loaned this new(ish) machine (around 2 years old). It's a Brother FS60 and today I read through the manual and got started with it. 

I LOVE IT! Such a different level of tool compared to the old one, despite only using a basic stitch it has numerous features already that make it excellent to use. It has a mechanism that enables automatic needle threading and a clever system to allow for a more drop in of the lower bobbin and the user not having to "pick up" the thread with the needle. It also ensures to stop with the needle always in the down position that means it is super simple to turn and continue seams etc. 


I've not gone too wild making things today, but I wanted to test how the machine performed on the very lightweight ripstop nylon I use for parachutes and it performs admirably. I quickly knocked up this useful storage bag for the annular parachute using some off cuts of the same material the parachute is made from. I then went on to do a quick and rough prototype of a small deployment bag using some dark blue nomex cloth and some 10mm elastic. Its great to confirm that this sewing machine can work across a variety of materials and deliver good results.... Now, if only the seamstress operating it (me) had some talent!!


Tuesday 1 October 2019

Thoughts on the TCT show 2019 and picture dump


So yes, got to go to the TCT show last week at Birmingham NEC and see the huge array of snazzy industrial CNC equipment. Lots of 3d Printers and definitely a lot of multi material extruders and systems for tool changing on 3d prints seemed the de rigeur for this year. 


There seemed to be a lot of smaller, but still largely unaffordable outside big industry, SLS type machines capable of sintereing lots of differing types of metals. There was a tantalising machine that doubled a SLS process with a 5 axis CNC mill, enabling,  for every few layers of sintering, a pass with tooling meaning that internal geometries could be finished to a very high standard and tolerance. 

Other stuff that caught my eye was there are some interesting filaments starting to hit the market that are desinged to be used in lost filament types of casting in combination with vacuum furnaces etc. Again its stuff that is not even potentially affordable to academic "maker" spaces, let alone community spaces, yet, as ever, it would be amazing to see these tools given to the really creative end of the maker community to see how far they could be developed and pushed! I live in hope!


Friday 20 September 2019

ODR Dual Deploy Flight and Test Flight for the Annular Parachute


Last weekend I went down to the excellent Midland Sky rocketry event hosted by the Midland Rocketry Club, it was a fantastic weekend with great weather and lots of flights. I was very pleased to successfully fly the ODR rocket again with the dual deployment working perfectly! The fab Alex Ward lent me an onboard camera and I had a padcam set up so there's a couple of nice videos below.


The other excellent thing was that my friend Charles Simpson wanted to fly my annular parachute on one of his rockets, his "zombie" rocket (as it had been resurrected a few times!) was about 1.6kg and the annular chute gave it a really steady descent rate on a single deploy flight. I would estimate it in the region of 6m per second. I know I am biased but it looked gorgeous in flight! I need to make more!

Tuesday 10 September 2019

Rocketry Series episode 6, Finishing the Scratch build and maiden flight


Episode 6 (although I keep saying episode 5!) where we finish the scratch build "VR2" rocket and give it a maiden flight.

Saturday 7 September 2019

Inflating the DIY 1.5 meter annular parachute.


So I have been working on and off on this 1.5 meter diameter parachute for a while now. It's been a great project and I have learnt loads especially about sewing machines! It's designed to be the correct size for my Level 2 certification rocket I am currently constructing. The parachute is designed with 16 "gores" or panels which are hot cut using a soldering iron.

 I made a plywood pattern to cut around and the hot cutting method works well as the edges are all sealed and don't fray. I added enough material to allow for a flat felled seam but cut the inner and outer edges to be the designed size with no seam. I think that this is strong enough but I am interested to make another and experiment with adding binding to the edges as I have seen this done on some ex military parachutes I own.


 After cutting all the panels it took a few sessions at the sewing machine to connect all the gores together, then came the task of connecting all the top lines which are the shorter lines on the inner diameter that connect into (hand sewn into) the main lines, with 16 of each that was plenty of work!
Above showing the stage with all the inner diameter lines sewn in on the machine. I just used 2mm braided nylon for this build as I had some and its quite cheap which is important when you use about 45 meters in this construction. Now that I have worked out some design issues etc I will probably make another at some point and use a higher quality material for the lines. 


Above is the first test inflation on a luckily breezy day. The geometry/shape of the annular design when inflated actually results in a much higher drag coefficient than other parachute designs which seems counter-intuitive particularly when you consider the huge hole that they have in them! Finally, massive thanks to my parachute making mentor BJ Gray of Bama Recovery Systems, who I heartily recommend if you want to purchase a very high quality parachute made by a true master of the art. 


Monday 5 August 2019

New Payload Tube Design and Rocketry Series Episode 4


So I have been working on the rocket with which I may potentially attempt my Level 2 High Power Rocketry certification flight. The nosecone for the air frame is quite large and I wanted to be able to use some of the area within it for a payload. In particular I am considering flying a DIY GPS tracker in it. I also wanted to firmly affix the bulkhead to the nosecone, probably by bolting it into the 3d print but also epoxying it in place so the bulkhead will be in place permanently. So I've designed and built this payload area that can be threaded in and removed. It consists of a 31mm OD tube with a threaded 3d printed adaptor glued to its base. Another 3d printed threaded section is glued to the bulkhead which receives the tube and allows it to be fixed in place.

Above the tube is glued to the 3d printed base which has an internal threaded section.

Inserting the payload tube.

Payload tube in situ and tightening the threads.

Above is the tube threaded through the bulkhead removed from the nosecone. I've 3d printed a press fit cover for the upper end of the tube, to make sure the cap is retained throughout the violence of a rocket flight I'm going to experiment fitting a flush mounted M2 machine screw to fix the lid in place. 

As part of this process I of course had to cut the card tube to the length I required so I made a quick episode for the Rocketry Series on my YouTube Channel about approaches to cutting cardboard model rocketry tubes. Enjoy and don't forget to hit like and subscribe!


Thursday 25 July 2019

Drone drop testing the Hexagonal Annular Parachute


A while back I came across this "Peak of Flight" issue all about odd chutes or odd parachute designs (Direct PDF download here). In it featured a tutorial for making an interesting looking Hexagonal Annular parachute, Ages ago I made a quick prototype using string and tape and the canopy cut from a plastic bag and it made me interested enough in the design to sew a small one from rip-stop nylon.

I wanted to test the parachute but didn't want to move straight to chucking it into a rocket so I decided to build a drop test mechanism I could attach to my drone. Rather than reinvent the wheel the servo holding pin pushing part of the mechanism (see video) was 3D printed from some files found on thingiverse here.

 In the (badly edited!!)  video above I walk through the main components of the drop mechanism and then show some clips recorded from today's test flights and test drops. Massive thanks to my son H (9yrs) for his excellent help in operating the release mechanism.

Friday 19 July 2019

Rocketry Series Part 2, OpenRocket Walk Through.


In this episode we walk through a quick rocket design in OpenRocket and then simulate its flight. OpenRocket can be downloaded for free here 

Wednesday 17 July 2019

Speaking at a Local Apollo50 event... I got to hold the moon!


Last night I spoke locally at MSParc a new science park building purpose built on Anglesey North Wales at a great event co-ordinated by MSParc and the local Dark Skies project. The event was family friendly and included a planetarium, some STEM activities, Dark Skies project info, displays of meteorites and local Astronomers showing off their excellent kit and work.

It was well attended and I was booked in to show some of my rocket on display and also to do a talk on SatNOGS and Librespace. It all went very well and was well received by a pretty fair sized audience for 6pm on a tuesday evening. What was really unexpected for me (as I hadn't read the full program!) was the final speaker booked after me was Dr Margaret Wood who spoke about her amazing career. Dr Wood has many accomplishments but in her early career she headed up a laboratory at Manchester University which was the most capably equipped laboratory in the world at the time to process and analyse the moon samples returned to earth by the Apollo missions. She spoke about this work and it was wonderful to hear and then she proceeded to produce some tiny grains of moon samples from that work (once Dr Wood found them in her hand bag!). It was an unexpected and brilliant end to a fab event to be able to hold a tiny speck of the moon.

Thursday 11 July 2019

Rocketry Series Part 1, Model Rocket Overview.


Just uploaded a video talking about model rockets, general overview stuff hopefully the first of a series with some more videos to follow on designing, running simulations and scratch building rockets.

Sunday 7 July 2019

Hand drill restoration.


So this had been my "ten minutes here and there" project this last week. I've had this old hand cranked drill for years and its been neglected and was ripe for a clean up. 

It was essentially in good condition but a bit rusty and faded so a quick strip down and repaint was about all it needed. Removing the spindle and chuck was slightly challenging as the pinion gear was held on with a press fit pin through the shaft which needed drifting out with a fine pin punch.
Quick sand down and ready for paint, I did consider staining the handle but after a sand it was quite pitted and not the nicest grain so paint seemed a better option.
Bit of paint and not being to precious as its a tool to be used not so sit on the shelf! 
Refitting the pinion pin and I was reminded why I adapted my little arbour press ram to accept and hold 10mm diameter tooling, it means I could just about reach in to get the pin refitted.
And there it is.. all ready for another stack of years of abuse! 

Thursday 4 July 2019

Perfecto Shaper update, made the missing part!


Just posted an update video to the youtube channel with a video update on the Perfecto Hand Shaper having made the part which was missing, check it out and as the tubers say.. don't forget to subscribe!

Tuesday 2 July 2019

Liverpool MakeFest 2019

Had a great day at the mighty Liverpool Makefest It was great to catch up with a lot of people and see some amazing projects. I'd tweeted about wearing my SatNOGS tee shirt and was really pleased that lots of people wanted to catch me for a quick chat about that project, Indeed the very next day DoEs Liverpool got a simple SatNOGS station up and running. Anyway... here is a quick round of photos with some quick notes in no particular order! 

So the first people me and my daughter chatted with were the mighty #GirlsWithDrills crew. I've been a fan of their vital work to make maker culture inclusive, equal and equitable. Bought my daughter a tee shirt and after a fab chat went in.

Quantum technology club has an amazing sign that did music and light sequences and was very cool. Brilliant to see this lot were talking about radios, had a CW (morse code) practice activity set up and had an SDR setup etc. They were really keen on the SatNOGS project and also chuffed to be introduced to HackSpace magazine and started downloading digital editions whilst we were chatting! 


Coretec robotics! Stallwarts of maker events throughout the lands, great to catch up with them and Seren enjoyed working through the make a flying spinny disc activity (build a simple driver circuit, connect it to a Pi, write/code a simple python script to spin up a motor to launch a flying spinning disc). As usual Coretec had a plethora of amazing robot builds including a nice balancing one seen below.


This 3d printed shelf bracket is one of the many amazing things on the little sandbox stall. This project is typical of little sandbox and shows how brilliant they are... They get their young people to design and build things like this that become part of the spaces they use, it helps create a sense of ownership for the young people over the project as well as teaching them some skills. Fab. They are also actively pursuing SatNOGS as a project and Rocketry... LEGENDS!

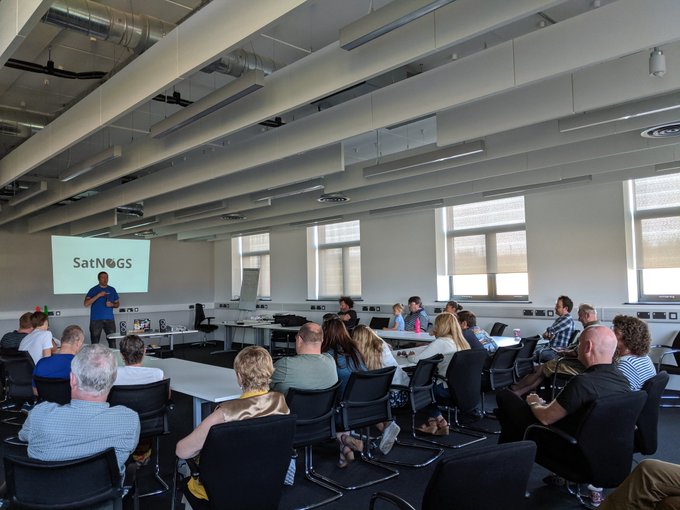
Around 11 am and the bottom floor starting to fill up.

Fabulous racoing game... the brio track has been fitted with neo pixels and the controllers (to make your pixel travel round the track) were those hand crank generating torch things. It was a fantastically playable game... I loved the details such as you needed to crank harder and generate more power to get up the hill or you would roll back and you would then accelerate on the downhill... Brilliant. 


 THE MIGHTY LES P.

York Hackspace as ever had some amazing stuff on display including this gorgeous Altair 8000 project!
 Above and below... 2 different versions of the classic snake game... It really entertained me that at Makefest you could play 1 dimensional, 2 dimensional or 3 dimensional snake in different parts of the show!

The fabulous Lorraine with her Cubert project right by the front door! A busy day for her with a fabulous project.

And finally Mark Mellors and his Hacky Racer, I got to have a sneaky little go and I have to say a Hacky Racer project is definitely on the list of future projects.

So there we go.. a great day out... If you haven't been to Liverpool Makefest you really should... it's fab!