Saturday, 9 November 2024

Repairing the Mundane, Bike Pedals!


If you follow me over on mastodon you might have got wind of one of my current ongoing projects, the restoration of a cheap but excellent recumbent racing bike. I'm collecting video and images of the process so I imagine there'll be a YouTube video and some posts at some point. I do lots of bike tinkering and it's really easy to fall into the trap of just adding better parts rather than restoring parts you have. I'm totally guilty of this but I do try and reuse parts elsewhere if possible. 

The recumbent arrived with a set of flat pedals on it. Painted bright red they were totally serviceable (one needed a little tweak of a nut to take out a tiny bit of play) but the paint was in poor condition. They are absolutely nothing special, they are alloy with cast in pins (the sticky up grippy bits) and as such would have originally been a fairly cheap pair of pedals, not even any branding or name. 

As I kind of progress as a maker type person I start to see more and more how much effort and energy goes into creating these low spec, but not the worst parts in all manner of products and items. If you have ever tried casting metal or machining some kind of curved bearing race cup you'll know too. 

Increasingly I see people repairing and I love it. I also see media starting to promote and push the repair agenda and I love that even more. However I've also noticed that, particularly in the higher end TV/documentary style repair stuff, that increasingly the things that are repaired are either very expensive high quality items (antiques etc) and/or things that people have incredible emotional attachment and investment in. Think Repair Shop and people weeping (quite rightly) over a wartime memento lovingly restored. 

I love it, but it's dangerous, it leads me back to these pedals, they are mundane. We need to repair the mundane too. It's highly likely that I will invest a lot of time into the recumbent bike project, and it might end up warranting technically better pedals than these. I might want different technology, I might want to clip in, but these pedals are serviceable and need to be reused. 

So I stripped them down, I sanded off the remaining paint and oxidisation and then gave them a coat of primer. I then realised that, due to their quick and budget production methods, they still had lots of casting flash from when they were originally made. Not warranting endless effort I ground back the worst bits and re primed them. I then did a poor but functional rattle can respray in a neon yellow. 

As part of the strip down I had to prise out the pedal caps to get to the retaining nuts etc. Of course these plastic items were very snug and to remove them created some damage. A quick measure with the calipers and a little bit of FreeCAD design work and I printed a pair of replacement caps in a pleasing green TPU filament. 

The axles were stripped and then re-greased before reassembly, they aren't pretty, I don't have a shot blasting cabinet or an indoor space for respraying so they are a bit rustic in finish, but, they are once again serviceable and, whilst I say the recumbent might warrant technically better pedals, these will find their way onto a project at some point rather than hitting landfill.


Saturday, 2 November 2024

Inkscape Path Effect: Ruler


As a maker I’ve often ended up making rulers and scaled items. If you have access to some kind of laser cutter/CNC router or even just a regular document printer, you can create all manner of measuring and metrology tools! Inkscape can make this process incredibly straightforward with it’s Ruler path effect.


It is a pretty straightforward path effect. In a new project click the Pen tool then hold the control key and left click on the canvas and drag to create a horizontal line. Set the stroke width to something reasonably thin like 0.2mm and set the length of the line to something easily divisible. We opted for 100mm.


With the line selected click “Path – Path Effects” to open the Path Effects dialogue tab on the right hand side. In the path effects drop down menu search for “Ruler” and then select it to open the ruler dialogue. This will apply the ruler effect to our line and you will see some ruler markings appear spread along the line. They probably aren’t spaced correctly so we will edit the ruler dialogue variables to create the effect we want. Let’s aim for a mark every 1mm with a longer major mark every 10 marks so we get a 10cm ruler with mm and cm marked.


First change the “Unit:” drop down selection to mm then set the “Mark distance:” value to 1. You should now see that the ruler markings change to be equally spread at 1mm distances along our original line. Next you can set your “Major length:” and “Minor length:” variable so that you have longer and shorter ruler lines, finally set the “Major steps:” value to 10. You should now see your longer “Major length” lines now appear every 10mm marking every centimetre.


Of course, you aren’t limited to creating rulers that are marked every mm. You can use this versatile path effect to make all manner of scales and rules. In the header image you can see it’s been used to make some “roamer” tools which are used in map reading and navigation. The ruler path effect has been used to make marks where every 4mm represents 100 meters for the 1:25000 scale roamer which is a common hill walkers map scale. Note that the actual ruler marks in the corners of the roamer designs have been edited so they don’t cross over each other. This has been achieved by selecting the entire path effect ruler and clicking “Path – Object to path” this means that then every mark of the ruler can be edited using the “Node Tool” furthering the use of this great path effect!


Monday, 28 October 2024

DIY Opensource Land Navigation Tools.


I’ve been practising my land navigating a little bit recently. With the short days and winter weather it’s useful to practice walking on bearings and other navigation techniques for when visibility suddenly worsens! As part of this I've made some DIY navigation aids. First up is some DIY lasercut perspex roamers. This was partly as I wanted to write an upcoming tutorial on the Inkscape Ruler Path effect (See recent other posts on the offset path effect and the corners path effect) which allows you to create precise graduated ruled scales perfect for all kind of measuring tools.

A “roamer”, or “romer” as some people spell it, is a tool that’s particularly useful when it comes to defining a grid reference on a map. The premise is pretty straight forward you identify the first two numbers of the grid reference directly from the line labels on your map and you then place the zero corner of the roamer on the position you want to create a grid reference for and then read where the roamer scale crosses the map lines to the left of and below the zero point. As an example in the image the grid reference of the Pumping Station marked on the map could be given as SH605641 or even more accurately estimated as SH60556413.


Many compasses have roamers marked on them for common map scales but this project started as my older Silva compass I’ve had for years didn’t have a roamer for 1:40000 scale which is the standard map scale for Harvey maps. After drawing the scales in Inkscape I then added a couple of scaled holes in the roamers which are handy for defining a circular area of a known radius on a map.

I’ve posted the roamer designs as they stand here and they are perfect for laser cutting and engraving, but equally, you could print them on card and they would work just as well!

Secondly I’ve been making some “ranger beads” from Paracord which is an interesting pretty knot with which you can create a sliding bead. A great use for these is they can replace a cinch toggle which is handy but you can also use them to make a great set of pace beads for navigation. There are many tutorials for this knot online like this video on Youtube.

The premise of pace beads is to keep track of the distance travelled on foot and it’s super handy if you suddenly end up walking on a compass bearing with no visibility. I’ve tied 10 ranger beads onto a doubled length of Paracord and then I can slide one bead to the opposite end of the cord when I have travelled 100 meters. To identify the 100 meters you need to somehow mark out 100 meters on a flat surface and then walk the distance counting your paces. It’s common to count 2 steps as a pace so for example you count every time your left foot lands. A good place to find 100 meters marked out is an athletics track on a local sports field, but failing that you can use online maps to drop a pin at a location and then measure out from the pin 100 meters and note exactly where that is. I’m quite tall so my average paces for 100 meters is 58 paces. I loop the pacer beads onto my rucksack strap and then as each 58 paces passes I pull a bead to the bottom, resetting all the beads when I have done this 10 times (Note I could really have just tied 9 beads as the resetting could be the tenth!). 

It’s really accurate, with practice you can even adjust your pace number for when you travel uphill or downhill and I find that I can, checking with the Ordnance Survey map route plotting and other GPS mapping) I can keep to within 50 meters accuracy over 2km, way more than you would travel without checking on a bearing.


Friday, 11 October 2024

Inkscape Path Effect: Offset


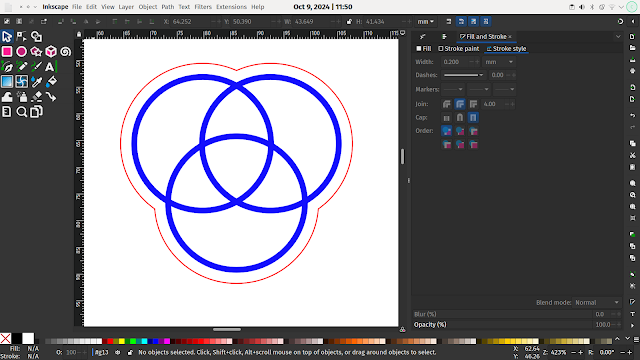
The Offset path effect can be used to create multiple effects. One useful application that helps to explore it is to create an offset outer path around a design. An offset outer path is useful potentially for design aesthetics but also useful for applications such as using a print and cut vinyl cutter or a laser cutter where you might want to print/engrave a design and then cut around the design following it’s contours.


As an example lets create a small logo and then create an outer offset path. To begin left click the Ellipse/Arc tool icon and then on the canvas left click and hold, whilst holding the control key, drag to the right to create a small circle. With the circle selected click “Object – Fill and Stroke” to open the fill and stroke dialogue tab on the right hand side. Selecting the “Fill” tab click the “X” icon to turn off the circles fill. Selecting the “Stroke Paint” and then “Stroke Style” tabs set the stroke width and colour so it looks similar to our image.


With the circle selected press control and C and then control and D to copy and paste a copy on top of the original then move the copy to the side. Create one more circle copy so you have 3 identical circles. Position the circles so they are similar to the overlapping design in the image. You can use the Align and Distribute tool tab found under “Object – Align and distribute…” to achieve this, or for this simple example, just align them by hand.


Next press control and A to select all three circles. Next click “Path – Stroke to Path”. This operation converts the circles strokes which currently sit on a central path in each circle so that there is a path at either side of the stroke. To be able to see this you can click “View – Display Mode – Outline” this display mode is useful as it shows paths as outlines with no fill detail visible. You should see each circle now has an inner and an outer path. Finally with the three circles still selected click “Path – Union” and you should see that your design is now one single object and the paths do not cross similar to the image.

Quicktip: Making a union of paths is incredibly useful when using tools like vinyl cutters where we don’t want paths to be cut in overlapping sections of a design.


Moving back into normal display mode by clicking “View – Display Mode – Normalwe can now use the path effect to create a path around the outside of our design. To begin this select our circles logo and then press control C and control D to create a copy. To make it easier to see what is happening let’s move our copy away from the original but leave it selected. Next press “Path – Path Effects” to open the Path effects tab in the right hand panel. From the path effects dropdown click Offset. In the resulting dialogue check that the unit is set to “mm” and enter a value, we added 2 mm. You should see that every path in the selected set of circles is now offset from its original position by 2mm as in the image. Changing back into the “outline” display view if you select the item using the “Node Tool” you will see that the nodes of the path are still in the original position of the circles. We next want to edit the Offset design so to do this we are going to click “Path – Object to Path” the offset design should now be paths rather than an effect and so the nodes will be editable on the actual design as seen in the image below.


Finally we can select the “Node Tool” and then use this to select the nodes of the internal paths and delete them so that we end up with just the external path created by the offset effect.


Moving back to the Normal display mode you will see that probably your new single path object has a fill, use the fill and stroke tools to turn off the fill and set the stroke size and colour to make a thin visible line. Next you can use the Align and Distribute tools to re align the new offset path around your original 3 circles as seen in the header image.


Tuesday, 8 October 2024

Inkscape Path Effect: Corner


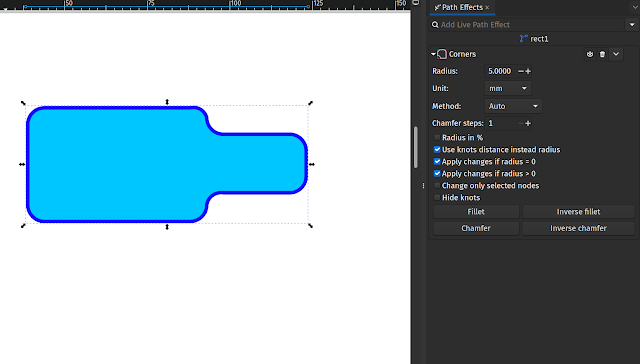
The Corner path effect can be added to reasonably complex paths to create radius corners. It’s a relatively straightforward path effect to use. As an example lets create a shape with a pair of rectangles and then apply the Corner path effect. 


To begin click the Rectangle Tool icon and then left click and hold on the canvas to start drawing a rectangle, drag the tool across the canvas to create a rectangle. Create a second rectangle and roughly arrange them as seen in the image.


Quicktip: If we just want to add rounded corners to a single rectangle or square we can select the item with the Node Tool and then either drag a circular node or type a radius into the Rx or Ry dialogue boxes.


Next press “Control A” to select both rectangles and then Path – Union to make a single object from the two rectangles as shown in the image.


To add the Corner path effect first select the union shape we just created and then click Path – Path Effects to open the Path Effects tab on the right hand side of the screen. You should see in the tab that the object, named “rect1” is listed below a search input box which has a dropdown menu. Left click on the arrow at the right side of the input box and you should see the available path effects as shown in the image.


Left click to select the Corners path effect and you should see the dialogue with the parameters for the corners path effect in the right hand tab. As a simple example of applying a corner effect let’s set the Units selection to “mm” and then type “5” into the Radius input box.


You should now see that the corner path effect is added to both the internal and external corners of our shape, you can see this in the header image at the top of this post. To remove the corner path effect at any time you can click the dustbin logo in the corners path effects dialogue.


Sunday, 8 September 2024

Wuthering Bytes 2024, OSHCamp photo dump!


Super minimal post! Just a few images as a memento and flavour of the event. 


The Fauxtrino Pt2!


A while ago I posted about picking up a cheap semi folding bike to kind of develop into a fake Velo Orange Neutrino, or as I dubbed it at the time, a "Fauxtrino". It's been a few months and I've made some changes to the fauxtrino, maybe less than I imagined, and I've used it a fair bit. 

First things first I swapped out the tyres for a pair of second hand Schwalbe Billy Bonkers, this was really a bit of a vanity job as the cheap Kenda tyres on it were pretty fit for purpose. 


The tyres were very lightly worn but can't have had more than a mile on them, they were a little grubby so gave them a bit of a scour and a dry before fitting them. They are a nice tyre and the added width is welcome in terms of smoothing out the bumps a little. 


For a little while I ran it on a set of flats I'd borrowed off a different ride as the fauxtrino had arrived with a curious pair of unmatched pedals, one that folded and one that didnt! My original thoughts were to not worry about the folding aspects of this project, and indeed I was going to swap out the folding handlebar system for a converter stem and a set of BMX style bars. However, it's SO handy to have the folding handlebars especially in terms of being able to sling the bike in a car boot. So I made the decision to go back to folding pedals as these dramatically reduce the storage footprint of any bike. 


I've a few folding bikes and I've run cheap dahon style (clones) on many of them, and whilst they are plastic and cheap they have worked OK. However if you have a little bit more to spend on a pair of folding flat pedals these Rockbros pedals which are built around a nicely machined aluminium chassis are really nice. 


The keen eyed and observant of you will see it has a frame bag that I sewed myself. It's not bad for a first go! It's a custom pattern made by taping a big piece of cardboard on the bike frame and making a rough sketch! I should really have lined it and many other improvements but all the seams are triple stitched and it's a good fit. Perfect for a spare tube, small tool kit and a pump. 


I didn't like the saddle on the original, it was massive and it used the old style seat clamp fitting which I find a pain. Ever since I bought my Charge Cooker Maxi which came with a Charge Spoon saddle I've ended up amassing a collection of them as they are really comfortable. To get a better more modern clamp set up I've added a gusset lofty seatpost. 


So that's pretty much the small amount of mods I've done. I've got a fair few miles under my belt on it now and it's a fun little ride for sure. I'm still prepared for the drive train to fail and be replaced but so far it's still working fine, shifting and indexing well. I would like to get a little more reach and handlebar angle options and so I think I might swap out the bars for a Brompton M style set. The other random little idea I want to add is to make a little velcro "portage" handle from some webbing as it's slightly awkward to lift the frame when it's filled with the frame bag!


Friday, 26 July 2024

HEXA Open Source Hexagonal Rocket


It's been a busy couple of weeks in the Concretedog lair! Numerous items have been restocked over on the Tindie store and a couple of new products have been released. The most notable though has been HEXA, my opensource hexagonal model rocket. 

A while ago I made some flat pack rockets for Hackspace magazine which had no tubes used in their construction. Whilst that was an interesting engineering experiment and produced some interesting rockets, it struck me that rocket kits without tubes are easier to mail!

HEXA is made from 3D printed parts and the hexagonal tubes are made up from 220gsm card stock using a cut and score technique which I have a small vinyl cutter machine doing so they turn out really crisp! 3D printing is obviously great for making parts but what's really useful here is you can print the nosecone with different amounts of infill to vary the weight to adjust the centre of gravity and stability of the rocket. At 20% infill the nosecone design prints to be around 10 grams in PLA and sets the CG perfectly, then, if you want to fly a payload in the upper section, like an altimeter you could print a second lighter nosecone to keep stability and weight optimised. Cool! 

Over on the project repository I've put together a 14 page PDF of documentation which covers building from the HEXA kit I am selling on Tindie, as well as tips and tricks for people creating their own HEXA from scratch. I've already seen some brilliant parts being printed where people are using a filament swap to make the nosecones look even more like pencils! The kits are complete with launch lugs and even a parachute kit for recovery, so, like many commercial model rocket kits, all you have to add is motors, wadding and launch gear. It flies really nicely on a B6-4 with plenty of altitude. 


Finally, I'm proud to say that I applied for and received OSHW certification for this project. In fact, it's the first OSHWA rocket ever to be certified! Hope to see more in the future.

Friday, 5 July 2024

My EDC Hand Sewing Kit


I've been doing a fair bit of machine sewing of late but whenever I sew, my little accumulated hand sewing kit is always at hand as I invariably need a needle at some point. The hand sewing kit is however more a kit for everyday carry for repairs which has certainly seen it's fair use. I thought it might be of interest to go through it and share how a few of the items are intended  for use.    

The case itself  is cobbled together from scraps. One half forms a pocket and the lid is lined with a piece of felt to hold a variety of needles and a small amount of tee pins. Not always sewing related, the tee pins are  regularly pulled from the kit pressed into service to unblock glue bottles and other fine poking! 

The pouch has a small piece of Paracord stitched onto it to which can be tied around the kit to keep it secure. I also have a smaller piece of cord stitched to the bag which has a loop tied and a quick link attached to which I attach a small classic Victorinox SD penknife.  I tie it to the kit as it's a nice little device that would be easily lost when repairing whilst camping in field or carrying out a parachute repair at a launch site. The penknife has a small blade, a file, a pair of fine scissors and tweezers and toothpick... more later on how I use it!

I also have a set of folding scissors that I bought in a sewing shop on the Isle of Arran a while back . They are super sharp and snippy and cut threads and fabric well. 

You'll notice I have some "wonder clips", these are fantastic little clips that have become a tool in all my    making.. they are so useful! I have a couple of hundred in my workroom but half a dozen or so is great for work holding for sewing repairs in the field. 

 I have a lighter, often the lighter is deployed to heat the end of Paracord or webbing to seal it and stop  it fraying, but I have another cunning use for the lighter. There is a bundle of white stuff, and a small roll of light green stuff. The white stuff is iron on stabiliser, I have loads of this for machine  sewing projects but carrying a little is really useful for repair . You can stop a small hole or tear from getting  larger by cutting a small patch of the stabiliser, then, without an iron, you can use the lighter to heat the file tool on the Swiss Army knife and use this to press fix a small patch in place. I can do similar with the green rolled material which is seam tape for Goretex garments, its super handy  to quickly  seal a small  hole  in  a garment (often after a barb wire fence crossing) but also could fix a small problem in a tent canopy etc. 

For thread I tend to wind amounts onto pieces of cardboard with slots snipped into them.  It makes the kit smaller than if you tried to carry actual bobbins of thread. As for the colours I tend  to either want muted and plain, or, really visible..    If I  am repairing something out and about I might use the day-glo stuff so it's easy to  find the repair again later when I might want to redo it in a more permanent  style. 

The  rest of the stuff is less critical, a few  buttons  a bit of cord. The small off-white pen like item is my quick unpick tool and of course, a safety pin or two are always useful  to hold  stuff or for reinserting a cord in a channel! Hope you enjoyed this little glimpse into one of my many bits and bobs kits I carry!       

Monday, 10 June 2024