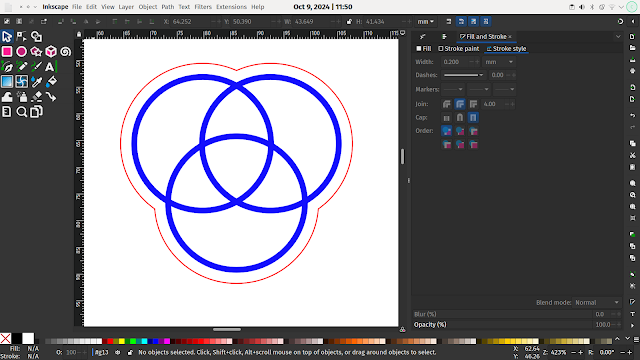
The Offset path effect can be used to create multiple effects. One useful application that helps to explore it is to create an offset outer path around a design. An offset outer path is useful potentially for design aesthetics but also useful for applications such as using a print and cut vinyl cutter or a laser cutter where you might want to print/engrave a design and then cut around the design following it’s contours.
As an example lets create a small logo and then create an outer offset path. To begin left click the Ellipse/Arc tool icon and then on the canvas left click and hold, whilst holding the control key, drag to the right to create a small circle. With the circle selected click “Object – Fill and Stroke” to open the fill and stroke dialogue tab on the right hand side. Selecting the “Fill” tab click the “X” icon to turn off the circles fill. Selecting the “Stroke Paint” and then “Stroke Style” tabs set the stroke width and colour so it looks similar to our image.
With the circle selected press control and C and then control and D to copy and paste a copy on top of the original then move the copy to the side. Create one more circle copy so you have 3 identical circles. Position the circles so they are similar to the overlapping design in the image. You can use the Align and Distribute tool tab found under “Object – Align and distribute…” to achieve this, or for this simple example, just align them by hand.
Next press control and A to select all three circles. Next click “Path – Stroke to Path”. This operation converts the circles strokes which currently sit on a central path in each circle so that there is a path at either side of the stroke. To be able to see this you can click “View – Display Mode – Outline” this display mode is useful as it shows paths as outlines with no fill detail visible. You should see each circle now has an inner and an outer path. Finally with the three circles still selected click “Path – Union” and you should see that your design is now one single object and the paths do not cross similar to the image.
Quicktip: Making a union of paths is incredibly useful when using tools like vinyl cutters where we don’t want paths to be cut in overlapping sections of a design.
Moving back into normal display mode by clicking “View – Display Mode – Normal” we can now use the path effect to create a path around the outside of our design. To begin this select our circles logo and then press control C and control D to create a copy. To make it easier to see what is happening let’s move our copy away from the original but leave it selected. Next press “Path – Path Effects” to open the Path effects tab in the right hand panel. From the path effects dropdown click Offset. In the resulting dialogue check that the unit is set to “mm” and enter a value, we added 2 mm. You should see that every path in the selected set of circles is now offset from its original position by 2mm as in the image. Changing back into the “outline” display view if you select the item using the “Node Tool” you will see that the nodes of the path are still in the original position of the circles. We next want to edit the Offset design so to do this we are going to click “Path – Object to Path” the offset design should now be paths rather than an effect and so the nodes will be editable on the actual design as seen in the image below.
Finally we can select the “Node Tool” and then use this to select the nodes of the internal paths and delete them so that we end up with just the external path created by the offset effect.
Moving back to the Normal display mode you will see that probably your new single path object has a fill, use the fill and stroke tools to turn off the fill and set the stroke size and colour to make a thin visible line. Next you can use the Align and Distribute tools to re align the new offset path around your original 3 circles as seen in the header image.


No comments:
Post a Comment