Tuesday, 19 December 2023

Custom Motor files for Simulations in OpenRocket from Thrust Curve Image


Openrocket is excellent and it’s fantastic to have opensource tools to design rockets and then simulate them in flight. The simulation aspect relies not only on the rocket design but also on good data being available for the rocket motor you wish to simulate. Openrocket has a built in database of RASP/.eng motor files for many common motors. If you are using an Estes for example then you are pretty much assured to find it in the database to run your simulation. What can we do though if our motor isn’t available in the database.

Well a first solution would be to see if there is a RASP/.eng file for your motor anywhere online. Starting off at the manufacturers site and then perhaps perusing through a few forums to see of you can search it out. Recently though I was looking at a new and pretty unknown motor here in the UK, the TSP E20, and I couldn’t find a file for it anywhere.


What I could find though were thrust curve diagrams for the motor provided by the manufacturer. I then recalled that there was a piece of software that purportedly could trace over a thrust curve image and create the file I needed. The piece of software that can do this is a small Java application called TCTracer and it’s available over on the Thrustcurve site. It’s available for a range of operating systems including windows Mac and Linux and it installed flawlessly on my Arch Linux machine.
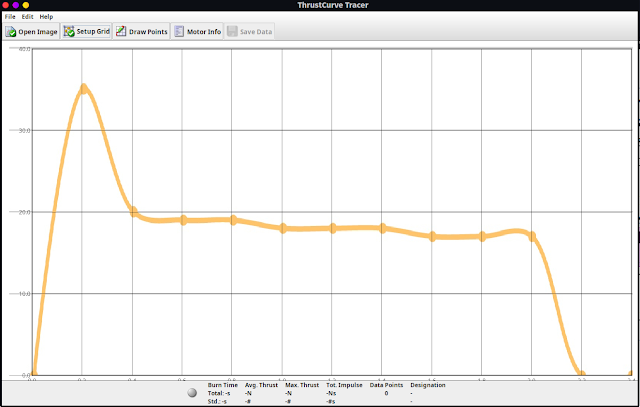


With that installed and the image of the target motors thrust curve diagram (a screenshot will do) we can create our motor file. You first import the image into the TCTracer application. As a side note I first trimmed my screenshot image with the wonderful free and opensource GIMP image editor. Whilst trimming made it slightly easier you can scale the grid in TCTracer to accurately place the grid range over your image regardless of what extra imagery is on the page.


Next in TCTracer click the “Setup Grid” button. You should see a small dialogue box “Grid Overlay which needs some details adding. First of all is the X axis start and end points in seconds. Most of the time you will want to start at 0 seconds and for our TSP E20 motor the curve chart data was logged till 2.4 seconds with a marker line at every 0.2 seconds. So we set the X axis at 0 to 2.4 seconds. The next line is the sub divisions of the X axis. Counter intuitively this isn’t expecting a value in seconds, it requires a whole number value that represents the number of subdivisions between the start and end point. In reality you can actually leave this empty or place “1” in there as you don’t strictly need the subdivisions, but it can be nice to make everything match up well visually. For our example we added “11” which means our 2.4 seconds contained the correct amount to place a subdivision marker at every 0.2 seconds. The last two lines are similar for the Y axis, you select the maximum height value and then the number of subdivisions. Our thrust curve diagram had a Y axis scale up to 40N in increments of 10N, even though the motor topped out at a little over 36N. So we set the Y axis as 0 to 40, the number of sub divisions to be 3 and set the units to Newtons using the drop down menu. Finally you need to drag the grid lines to align them with your image, note that you align them to the image chart lines and not the peak of the curve.


Next click the “Draw Points” button. You can then trace over the curve in your image. You don’t need to place a point at the zero time point rather just start clicking the line to trace over it. At the end of the thrust curve you definitely need one point to have returned to zero thrust or else you will have a small error indicator at the bottom of the page. To undo a misplaced trace point simply left click on it again to make it disappear.
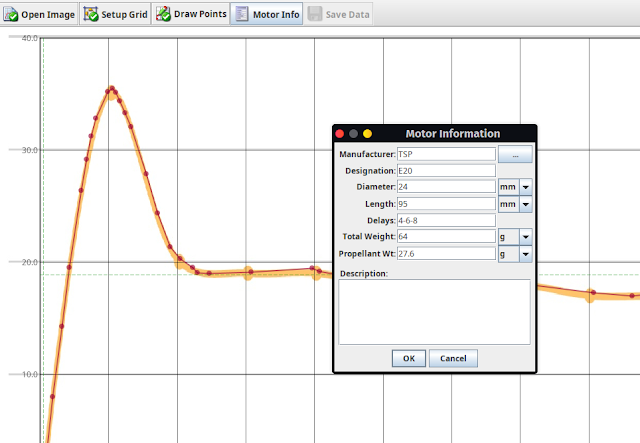


The final part of the process is to click the “Motor Info” button and in the Motor Information dialogue add the details of the motor. This is a largely straightforward if you have the data about the length and the weights of both the complete motor and the propellant. To add a choice of ejection delays you can add the value in seconds followed by a “-” so for example 4-6-8 in the delays section of the motor info dialogue will allow you to switch between a 4, 6 or 8 second delay in Openrocket. With all your motor information added click OK. Finally click the “Save Data” tab/button and save the .eng file.


In Openrocket you need to provide a path to where you have stored your .eng files. To do this in openrocket click “Edit” and then “Preferences”. On the main preferences dialogue box there is a section titled “user defined thrust curves” click the “add” button in this section and navigate to the folder/directory holding your .eng files and then click the new “add” button. I’ve found I need to then close and reopen Openrocket to set up the path correctly. Now if I go into select a motor I have the TSP E20 with various delays available to select for simulation.


Massive kudos to John Coker who created TCTracer and maintains the Thrustcurve.org site.


Tuesday, 31 October 2023

Desk Vice Restoration, 3D printed jaws from Pop/Soda Bottles!


I love having a desk vice at my workstation. For ages I used my small Record "Imp" vice but that is doing good work in one of the sheds. I'd been using a cheap new no brand clamp on vice for a while but I was fed up with the non replaceable jaws not closing true. I spotted this interesting vice on Ebay a while ago which, although unbranded, is a reasonable little thing that also can swivel on it's base. I liked the width of it and the general form factor and put in a very low bid. It was pointed out in the listing that one jaw had been replaced with a piece of wood so I won the auction for very little cash!


As arrived the vice was a bit sorry looking with it's one wooden jaw that had been glued on! I stripped off the wooden and the steel jaw and cleaned off as much glue as I could. The metal jaw was held on with 2 M4 bolts and, after cleaning and then re tapping, the holes behind the wooden jaw were ready to be used again. I don't really do anything heavy on my desk vice, small work holding is the order of the day with anything needing more than delicate handling going into a bigger vice in the sheds. Whilst I should have fired up the milling machine and made up a set of aluminium soft jaws for this I decided to do a quick experiment and 3D print some jaws. After a quick digital caliper session on the original steel jaw I quickly knocked up a jaw in the amazing FreeCAD


Finally, I printed the jaws and fitted them. Interestingly I've recently written a series of articles over on RS Designspark where I built a "pullstrusion" system capable of turning plastic pop/soda bottles into decent 3D printable filament. So these jaws used to be about one and a half 2 litre lemonade bottles. You could probably make 2 jaws from one bottle but I bumped up the infill to around 50% to make them a little durable. So far the jaws have held up well. You could also consider them semi sacrificial as it's trivial to print up a new set. Speaking of which I definitely plan to print up a set in flexible TPU filament to create a proper set of soft jaws. 


Wednesday, 18 October 2023

FreeCAD and Openrocket, a fabulous combination!


FreeCAD, aside from generally being an excellent free and opensource CAD environment is ever developing and being extended. Over the last year or so a really interesting development has been the Rocket workbench. If you are new at the zoo, FreeCAD works with a workbench system where different workbenches contain lots of different tools grouped into themes. So for example if you want to convert a 3D part into a technical drawing there is a specific Techdraw workbench which, when you switch to it, has all the tools to lay out a technical drawing. Many workbenches are built in but you can also download and install extra workbenches of which the Rocket workbench is a good example. I’d love to see more rocketry people using FreeCAD and so this post is aiming to show why FreeCAD, as well as Openrocket, might be well worth learning!


Openrocket and FreeCAD have lots of active development happening and it just happens that an amazing contributor, Dave Carter, AKA DavesRocketShop, is contributing development to both these excellent opensource pieces of software. Further than that Dave realises how powerful interaction between Openrocket and FreeCAD might be and is working to make both these packages work together usefully.


As a starter example (but frankly enough of a reason for many rocketry types to learn some basics of both these packages) is the built in parts database. In Openrocket if you are designing a rocket from scratch you might chose to incorporate an off the shelf nosecone for example. Clicking the Nosecone icon in openrocket the component database will either launch automatically, or you can launch it from the regular nosecone dialogue window by clicking the “parts library” button in the upper right hand corner. Either way you’ll see a well maintained and curated list of commercially available nosecones from a range of manufacturers.


OK, Over to FreeCAD. Say we now can’t find that commercial part to buy in our local rocket shop we might think about having to draw it in CAD and perhaps 3D print it. Well, the exact same database is available in the Rocket Workbench in FreeCAD. Clicking the nosecone tool icon should launch a nosecone parameter dialogue in the combo view window on the left of the screen. Scrolling down you can click “Lookup” to launch the exact same database of components as you just launched in openrocket. You can scroll to the same nosecone and select it and it will appear as an object in the live preview and also as an object in the combo view. If you wanted to simply 3D print this you can select the object in the combo view window and then click “File-Export” to export the nosecone ready for printing. You can pretty much do this without learning any more about FreeCAD and Openrocket if you wanted too, but, if we learn a few more skills, we can do some other really simple yet useful rocketry tasks.


Another simple example perhaps of use is imagining we want to build an upscale version of a rocket with a scaled up nosecone. If we select a nosecone from the database in FreeCAD we can then jump over to the Draft Workbench. With the nosecone selected we can now click the “Scale” tool icon. As a tip to help you find tools, if you hover over any icon in FreeCAD it will say the name and a small description of the tool and I describe the tools with the names these rollover descriptions use. In the scale dialogue click the “enter point” button and in the next dialogue make sure that both the “Uniform Scaling” and the “Create Clone” buttons are selected. Then change any one of the X Y or Z axis scale amounts to the scale you require, so for example if you want to double the size of the nosecone change one value to “2”. The other values should change automatically and then when you click OK an upscaled (or downscaled) version of your nosecone will appear as an object.


Finally, for this example, if you know a little about using FreeCAD you can easily add geometry to parts you create on the rocket workbench. In the image I’ve simply brought a cloned nosecone part into the Part Design workbench and then added some features to make an attachment point for a recovery system. If you are interested in developing your FreeCAD skills my free to download tutorial book FreeCAD for Makers is available from the Raspberry Pi Press here.


This is only the tip of the iceberg in terms of what what FreeCAD and Openrocket are capable of. The Rocket workbench is amazing in terms of what it can automatically generate parts wise. Nosecones, transitions, tubes rings, rail buttons, rail guides and more; there is a really impressive fin can generator as well as some pretty high end fin flutter analysis tools. The real beauty is that you can simply transfer dimensions and data over from a design you have worked on in Openrocket. Having rebuilt it quickly in FreeCAD there are so many options available, as an example I can simply select a centring ring in the FreeCAD design and take that part to the Path workbench and create toolpaths to then cut the rings on my CNC router. I can export all manner of files for parts for laser cutting or other processes. It’s a really good tool to learn some skills on if you are a rocket fanatic!


Monday, 2 October 2023

Ballooning at Liverpool Makefest and Lessons Learnt.


So this could win the award for the most overdue blogpost ever. Back in summer I attended Liverpool Makefest as a maker and showed off lots of flying stuff under the title "Concretedogs Flight Lab", which coincidentally is also the title of book of projects I've been not finishing for a long time! One of the activities I showed and told at Makefest was my DIY Hot Air Balloons.

I originally wrote about these ideas back in Hackspace Magazine Issue 61 where I talk about their construction. As most councils have quite rightly banned the use of fire filled disposable balloons the approach here is to heat the balloons to perform shorter hop like flights and, when indoors, use a light kite line as a tether.


Previously I'd heated the balloons having an assistant hold them up and I fill them from the base with a single electric heat gun. But in an attempt to create more lift for this event I made a chimney from a meter length of vitreous enamel pipe into which fed 2 electric heat guns. It definitely makes more lift but I think the concept could be improved a lot. One of the issues is that the air is constantly moving and being pumped into and out of the balloon. It would be better to have less movement of the hot air and more heating! One possible solution would be to have a series of baffles in the chimney so that it creates more heat and less airflow. The other option I'm still really keen to try on a calm day outdoors is using a camping stove in the base of the chimney to get a high temperature whilst not creating a moving column of air.

The other challenges are the tether, there is of course the challenge of keeping the tether light and as altitude increases the weight of the tether becomes more apparent. Another problem I had at Liverpool was that if the tether snagged (usually on me!) this would cause a jerk in the line and often, especially when the balloon was quite high with a lot of tether weight, the balloon canopy would tear. I'm planning to run some experiments with a small length of really lightweight thin shockcord/elastic at the balloon end to try and mitigate this problem.


Wrapping up, this activity was great, loads of people mentioned that they wanted to try it and lots of people were entertained by the site of the balloons. It really is a lot of fun for a couple of quids worth of materials!

Monday, 4 September 2023

Starting HEMA Longsword, Indoor Training Sword Project on Printables


I've recently started training in HEMA (Historical European Martial Arts) with a focus on German longsword. I live in a small house with quite low ceilings so swinging a meter plus synthetic trainer around won't work. I'd been using a length of 25mm dowel but you have no edge orientation, ie which side of the sword is which, or crossguard orientation so wanted to improve it.


I've modelled a simple small crossguard and a pommel in FreeCAD and printed them out. I glued the crossguard sections out in petg and have glued them into position to give me a similar length handle to my synthetic trainer. The pommel is glued on first to make sure its exactly lined up and then a screw was inserted into the printed and countersunk hole to make sure it definitely stays in place.  The slight challenge with a piece of 25mm dowel is that it obviously isn't balanced in the correct position or weigh anything like a synthetic trainer or a steel federschwert. So to partially rectify this I've drilled (off centre of course!) a long hole into the tip of the dowel and poured in glue and added lead weights. Whilst this doesn't make it as heavy as a steel it does correct the balance point to around 6 cm in front of the guard. 


It works really well and whilst it definitely is not as good as getting outside with a full length trainer or steel it is excellent for indoor wet weather sessions or for sticking in a bag for use in a hotel room etc! I've put both the STL and the FreeCAD project files up on Printables here


Sunday, 20 August 2023

Cheap Wireless Earpick (eeeurgh) makes Reasonable Inspection Camera


I'd seen a couple of examples of people buying these little "earpick" cameras and using them as electronics inspection cameras. I then saw the NE3 earpick camera for just £6.99 delivered so thought it was worth a go. I DEFINITELY DO NOT recommend these as an item you should stick in your ear... in general I believe the best advice is that nothing should be put in your ears unless under the direction of a medical practitioner. Anyway, the £6.99 device arrived, it's pen sized, has a single button, a metal tube/probe and came with some soft silicon attachments for digging around in your ear. Curiously mine also arrived with an extra small leather pouch outside of the main box with some steel implements inside it.. again.. these aren't going anywhere near my ears, but I may yet think of a use for them!


When you turn the device on with a long press of the button the camera end of the probe illuminates with a decent amount of light. The device broadcasts it's own SSID and you need to download a slightly spurious, but functional,  Android app from a QR code in the manual. In the app you select the wireless network and then you get a live image (with very little latency I was surprised to see) on your device. You can then click to take a photo or long press to create a video clip. 


It's not  super high resolution and is distinctly SD in it's flavour, but it's probably more than enough for inspection situations when you are out and about and away from anything better. I could certainly imagine using it to poke into little gaps and holes in enclosures and perhaps for peaking into rocket airframes. For £6.99 it's a steal. 

FWIW The device charges via USB C and theres a small cable included. Other models and other people have found that if they USB similar devices to a laptop that they can get these to appear as web cams. I haven't been able to get this to be detected on any of my linux boxes, but I'll keep tinkering and feedback. 


Just to finish off here is a tiny video clip from the device. 


Monday, 24 July 2023

Makerspace Arran


I'm really lucky that over the years I've got to visit and work out of loads of makerspaces, hackerspaces, fablabs and others. Mostly in the UK but a few notable overseas ones also. I can't say that this one is overseas, well apart from you need to get a ferry to visit Makerspace Arran on the fantastic and beautiful Isle of Arran. 

In fact, if memory serves this is only my second ever Scottish makerspace, my first being the sadly missed Maklab in Glasgow which I was lucky to visit and hot desk from a few times over the years. I was really interested to have a quick look at Makerspace Arran as it's in a similarly remote and rural position as some of the Ffiws makerspaces I've been involved with here in North Wales. It was only a flying visit but it was lovely to see a few of the projects I'd spotted on Makerspace Arran's social media in the flesh. The space is actually on two levels with the ground floor being a shop. The location of the shop is right at the start of a very popular walking trail up Goat Fell which is the highest summit on the Isle of Arran. Also at the foot of the path around the makerspace are a garden centre, a pub (which does great chips) a microbrewery and a leather workers workshop and shop. There's a stack of parking and a lot of tourist footfall in the area. 

The shop sells stuff that has either been made in house or has been made on the island and has a great range of gift items that are really nicely curated and relevant to the location. There are no "kiss me quick hats" or other generic stuff, everything is made here, and has links to Arran. It's really impressive. There's lots of stock of tee shirts commemorating your walk up Goat Fell and small lasercut medals as a reminder of your successful ascent. They've researched some of the traditional historical games that would have been played on the island in times gone by and reproduced them using the laser cutter. They are also up for helping out other producers and makers. 

There were some lovely cast epoxy broaches and necklaces where the epoxy has been cast into the shape of Arran itself and Mark told me about how they had used the 3D printers to help create objects to then create silicon moulds from to help the maker increase production and accuracy. One fantastic project is the lasercut Liberator 1 LB30A kit which has a sad connection to Arran in that one crashed into Mullach Buidhe in 1941. The lasercut kit is created in 1.5mm plywood and has interestingly used as a source an old book of air plane silhouettes which was created in wartime as a guide for civilians to identify aircraft. 

They aren't all about the profit though, the small makerspace located above the shop is beginning to look at running workshops for anyone to book into. There's currently an exploration to see if there is enough interest in workshops around scale modelling using kits. I did offer to run a FreeCAD workshop up in the space whilst we were visiting but sadly, due to some makerspace members being off the island that week it wasn't to be! Ah well maybe next time!


Tuesday, 9 May 2023

Hipster PDA Stencils, My First Printables Upload.


Long time readers (and my what a wonderful select bunch you are!) will recall I've been pretty obsessed with Index Cards and the idea of the Hipster PDA for a long time. Over the years I've designed, tinkered with and scavenged all manner of HPDA systems ranging from the classic binder clip and card, through to unconscious making of HPDA boards and even a nice Living Hinge Lasercut Design over on thingiverse. I've also recently started keeping an offline calendar, this is for a few reasons, one is at both my gym and where I train martial arts I have no signal/connectivity (yes rural mountain N Wales still offers some pockets of no 4G!) but I still need to check dates for sessions and exams and such. Some true disciples of the HPDA path go as far as buying printers that will directly print to 3*5" card blanks, but I wanted to take a leaf from the "journaling" community and create some stencils. 


So there's 3 stencils so far, a simple tick list, a universal calendar and a slightly odd mind map one! I've also been meaning to move over to Printables as a site to share my occasional small designs and so thought these might make a good first upload. Do feel free to check them out, download and print


Monday, 1 May 2023

DPPD, The Drop Pod Parachute Deployer


Just uploaded a video of the DPPD, as it reached the significant milestone of having operational code, and, although not mechanically complete, is a functional prototype running happily off a small LiPo cell. It's a good example of my new Pull/Drop pin switches which I'm selling, amongst other bits and bobs on my Tindie store

If you are interested I also put up another video (below) which goes through the setup and use of the Pull/Drop pin switches... it also has an amusing section where my brain cannot remember the word Kevlar! 


Monday, 24 April 2023

New Stuff on Tindie and more in the pipeline!


It's been a while since I restocked Tindie, and I only used to have a couple of products but a few things I've been making and building recently others said they would find useful so a few new items have made it to the store. First up is a remake of my popular Rocketry Screw Switches. The originals I used to CNC rout here in my lair, but finding time to run the machine was a faff, so I re-span the design to be able to get them produced by OSHpark meaning that I can restock them a little easier if they sell out. I won't waffle too much detail here but if you want a rugged set of switches that survive high g violence then these could be just the ticket whether that for a rocket or a combat robot or anything else!
Next up and new at the zoo is a kit of parts to make a Pull Pin style switch, excellent for remove before flight arming or there are options and features that make this attractive for low friction " Drop a payload with the pin staying on the vehicle" type systems!

Finally completing the trio of bits is a little assembled PCB which acts as a polarity protector, these are small enough to be soldered inline in a cable and covered with a little heatshrink, they can work at any voltage up to 20V DC and with a max current of 4.3A. If ever the power is connected backwards no current can flow through the board and both the board and the attached project will be undamaged. Connected correctly the little board draws less than a milliamp with no step down in voltage. Neat and can save your expensive experiment/avionics/altimeter etc on the other side! Check out the whole store here.


Tuesday, 18 April 2023

New Pin Switch Video and Tindie store previews!


Been working on a few small projects and amongst them I've ended up designing, or redesigning some components that I think might be of interest for others, so over the next couple of weeks I'm going to get put some of these up on my, long neglected,  Tindie store. In the above video I'm doing a show and tell of some new pull pin switch assemblies which can be used as rocketry arming switches but also can be of use for payload drop mechanisms or other pull pin applications.  


I've also remade a version of my rocketry screw switches (although these are useful for any system that needs rugged violence proof power switching.. combat robots etc) I used to make these CNC routing them in my lair but that took a lot of time and I never got around to doing it so re-spinning the design means I can get the PCB fabricated by OSHpark. This means I should be able to produce stock quicker with less hassle for me, I plan to sell these in packs of 2 for $7.95, roughly £6.50.


Finally, I've also revisited my polarity protector board. These little boards only allow power through if they are connected the right way and therefore protect attached projects from reversed polarity. They draw a tiny amount of power (I don't even have anything capable of accurately measuring such small draw!) and can handle up to 20V input up to a continuous 4.3A. They are tiny and can be soldered into a wiring loom and covered in some heatshrink, or you can use them with pin headers, you could even attach the output to a breadboard. I'll put more details up on the Tindie listing when I get some stock built!

Thursday, 16 March 2023

Manjaro, Rocketry tools agogo!


I've been a long time Linux user with my first distro back in the day being Pure:Dyne followed by Dyne:Bolic. In more recent times I've tended to lazily reach for Ubuntu as it's mostly worked and I've spent a bit of time around variants like Kubuntu, Lubuntu and Xubuntu. However, I've started getting a bit disgruntled with the Ubuntu experience, I've not been a fan of snap which has been more and more intrusive and generally it's not been the easy, hassle free experience I want. 

So Manjaro, I'd actually played with this on the pinephone as a phone OS and found it nicely designed and quite refined so have been trying it a bit on and off and then finally this week got around to doing a full install of Manjaro Xfce on one of my laptops. Install is really straightforward and everything has worked driver wise. I made the bootable pendrive a couple of months back using 21.3.7 and there were a few updates on first install and everything went smoothly. A notification that there was a newer kernel led me to quickly use the Manjaro Settings Manager gui to really simply update the kernel to the latest stable and again, everything was plain sailing with this. 


So, my go to tools that get set up on all my machines are Libreoffice, FreeCAD, Inkscape and Openrocket. The graphical user interface for package installation is called Pacman and it's simple to install Libreoffice, FreeCAD and Inkscape directly there and all of them are nicely up to date with the latest stables from each of those projects, many thanks package managers! Moving into FreeCAD vers 0.20.2 my first port of call is to install the excellent rocket workbench here I had a small problem. When iswitching to the rocket workbench it failed with a "libQt5Charts.so.5:cannot open shared object file", reading around the freecad error messages It was a missing dependency Qt5_charts. Sometimes, before diving into a terminal it's worth exploring the package manager GUI and sure enough searching Pacman found Qt5_charts and installed it readily. With a reboot of FreeCAD the rocket workbench is up and running perfectly. 


Inkscape installed perfectly well and I'm slowly adding and checking the range of extensions I use to drive various machines or draw or generate various geometries etc. So that left OpenRocket. A search of Pacman revealed no Openrocket, so just taking a punt, I opened a terminal and used the very handy: 

pamac search openrocket

which returned that indeed the latest Openrocket package (22.02-1) was available on the AUR (Arch User Repository) so then issuing a simple:

pamac build openrocket

Installed the package. However, veteran OpenRocketeers may recall there is sometimes some shenanigans that manifest when the incorrect Java Runtime environment is being used by the system and Openrocket want's a particular one and indeed Openrocket wouldn't run.  A quick search revealed the very useful "status" command so "archlinux-java status" showed originally that Java 17 and 19 were installed with 19 set as default. Open rocket wants 8 or 11 and so a package search led me to install Java 11 runtime and then we can us "sudo archlinux-java set-11-openjdk" to set the Java 11 runtime as the default. Then Openrocket is working flawlessly. 


So hey presto, we are all setup in a nice modern feeling distro that seems quite intuitive and seems consistent in the way things work. I look forward to setting up more tools and using it more fully over the coming weeks. 

Wednesday, 18 January 2023

Pasting Table Mods, a Temporary Autonomous Workspace!

I've been working on lots of larger lightweight projects of late. You might have seen the hot air balloons I'm designing and building from large tissue paper panels but I'm also working on some larger cloth wing designs and more. I often don't have the length I require for the work on my shed workbench or regular bench in the house. So I went and bought a wallpaper pasting table. They are CHEAP! But with cheapness comes lightness and some lack of rigidity. However, for lightweight tissue paper or cloth work they are perfect in many ways and create a great Temporary Autonomous Workspace (been reading a lot of anarchic stuff lately and this name has stuck in my mind!)
There's one problem for me though, they are built way too low! Even doing light work standing at one of these for half an hour causes my lower back to start to grumble, I needed to raise the table, but equally I needed the mod to not stop the table folding away. 


So off to FreeCAD! (ICYMI here is a free to DL book I wrote on FreeCAD) The solution is pretty simple, there's enough room to add an adaptor to the 20mm square-ish legs and still allow the legs to fold away inside the table. I quickly CAD'ed an adaptor which had a square hole for the original leg on one side and then had a circular hole to receive some 25mm diameter dowel I had knocking around in the shed.  Once printed up in some PETG filament I epoxied the adaptors to the table side and then they live permanently attached and fold away with the legs. 


I then chopped a few dowels to length to bring the table up to where I need it. The 3D printed adaptors are a press fit on the dowel side which means I can insert the leg extending dowels and turn the table onto it's feet without them falling out. In turn the dowels can sit inside the table when folded, I should probably create some kind of storage strap or mount to stop them clattering about inside the table, but it certainly does the job. Available widely for around £15-20 this is a really handy tool hack for me!

Friday, 6 January 2023

Nextool Vanguard; a £32 Multitool Review


A while back in issue 58 of Hackspace magazine I reviewed a small folding scalpel the "3 Coil crane" and it's a fabulous tiny tool. I ordered that scalpel from a company I've used a fair bit over the years, Heinnie Haynes, who are based down in South Wales. Heinnie sell lots of outdoor equipment, clothing, shelters, packs etc, but they specialise in bladed tools and have a huge range including multitools, bushcraft knives and more. 

I sent them the link to the Hackspace article and they told me to mention anything I saw that I thought might be good for a review, that might be of interest to makers. Recently they've started stocking some interesting multi tools that sit at the budget end of their multi tool offers. The Nextool range is pretty affordable and one in particular stood out, the Nextool Vanguard as it has a built in adjustable spanner. I wanted to take a look and Heinnie were kind enough to send one out to me. It's been in circulation for a few duties over the last couple of weeks and I've put together this little video review. Hope you enjoy the video and do check out Heinnie Haynes, they've always given great service over the years and I'd genuinely recommend them,