Tuesday, 31 August 2021

Tool Tuesday - The Digital Multi Meter


The Digital Multi Meter or DMM is never far away from my hand and gets a lot of use. I was recently reminded of how it also can make some aspects of electronics more accessible. DMM come in fantastic variety of  flavours and models and are available from around £5 through tow hundreds of pounds. They have heaps of uses and capabilities, measuring voltages, current, resistance, checking capacitors, and much more. I tend to use two functions of mine massively, checking DC voltage level is a popular task and also checking continuity ( a mode where if there is a connection between the probes it will beep) is so useful to check if something is connected. 

Many DMM will check resistance but with some you need to know the order of magnitude you expect the resistance to be. These are selected using the rotary switch. Some DMM are "auto ranging" and as such will switch the units detected to the correct one for the measurement. So when checking a resistor that is 10,000 ohms it will detect and switch to give the value in kilo ohms. I ran a soldering workshop recently and I always give a short example of using the colour codes on a resistor to decode its value. However one of the participants was red green colourblind and would struggle to decode the band colours. Not a problem with an auto ranging DMM! The list of features on a basic multimeter is impressive but the list of all possible features in endless. Whilst for regular mains work I would want to spend more on a quality known brand, it's fair to say that for low voltage work electronics hobby stuff really good auto ranging DMM can be found for less than £20. A useful addition to any bench.


Tuesday, 24 August 2021

Tool Tuesday - The Breaker Bar


This week I've been swapping some wheels around on my old VW Caddy Mk2, well actually on two Caddy's, my one on the road, and my off road spares donor vehicle! It's common for tyre companies or garages to fit wheels using a compressed air impact driver and as such wheel nuts can be pretty heavily over torqued and difficult to undo. The answer is the humble but incredibly useful breaker bar. A breaker bar is a long oversize bar with a socket fitting at one end so it can receive a socket wrench. They are usually none ratcheting as socket wrench ratchets aren't often capable of very high torque. My breaker bar has a 1/2" socket wrench fitting and it lives in my van with a 17mm socket on it at all times as that is the size of my wheel nuts. I also carry a 19mm and a 21mm socket with it in case I can offer help to anyone changing a wheel as these are the other two common wheel nut sizes.

They work very well and definitely make life easier than trying to use the shorter lower quality tools that are often bundled with a a small spider jack in many vehicles. 

Tuesday, 17 August 2021

Tool Tuesday - Archimedes Drill


The archimedes drill is a very useful tool for making small holes in a variety of materials. At the chuck end they have a floating collar you hold to steady the device and use your other hand to plunge the handle causing the archimedes screw to turn. As such you can moderate not only the speed, but also the downforce. This results in a sensitive drill thats really handy when accuracy and good finish are important. I use mine often to pick up small marks/punching when a centre drill would be too large. I've also used it for PCB drilling when hand etching boards as it gives cleaner results than a dremel type tool. 

Monday, 16 August 2021

Free Flight and tinkering with vinyl cutters and lasers!


I've been getting interested in free flight aeroplanes and plane design in general. I really am a newbie though and as such I've been building some simple kits to gather some experience. The BMFA sell a range of educational kits and one of them is recommended as a good starting point for building with balsa. The Gymminie cricket is a simple rubber powered free flight model that is aimed at indoor flying in a sports hall or outdoor flying on an incredibly still day. It's a very affordable kit at £3.50 and gives some decent experience of building lightweight airframes with balsa and tissue. It's a good lesson in delicate working but the stuff/skills that you learn on this applies to any classic balsa and tissue build. 

My interest in the Gymminie cricket design overlapped with me getting hold of a secondhand vinyl cutter, a silhouette cameo mk1. This machine has been great and warrants a post all of it's own at some point, but as a quick overview I have it set up and running being driven from Inkscape with a great opensource plugin extension.  Whilst I've predominantly used the vinyl cutter to cut vinyl stickers (see the next plane in the post) I spent some time dialling in an approach to be able to cut tissue paper. Its definitely possible but is a tricky balance of cutting feeds and speeds, backing board tackiness and general operator competence and patience! The two Gymminie cricket builds have been a great test bed for lots of tissue experiments.

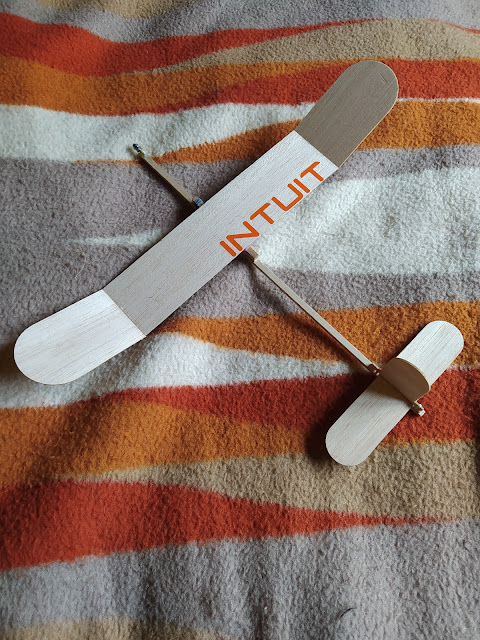
I wanted to jump into trying to design and scratch building my own planes. Starting simple I've been tinkering with an all balsa chuck glider design which I've named "Intuit" because, you guessed it, it's been mainly built on intuition rather than any decent engineering knowledge! Whilst I could have hand cut the balsa with a craft blade I've been cutting balsa successfully on a CNC laser diode engraver rig which I can't talk too much about as it's destined for review in Hackspace magazine. However I can go as far as saying it's nice to be able to cut balsa accurately and this chuck glider is starting to perform well with the various adjustments to trim and embellishments it has. I've certainly learn't loads and it's good to apply bits of reading around general plane principles and aerodynamics to actual things that attempt to fly. On the horizon is more chuck glider designs, I'd like to try a rocket boosted swing glider ( a rocket that deploys glider wings and glides for recovery) and I'm quite interested in using small motors and supercapacitors for electric free flight experiments. More post will follow!

Tuesday, 10 August 2021

Tool Tuesday - Wera Kraftform Precision Hex Drivers


I have to say I am a Wera tool fan and my fanship mostly centres around the Wera Tool Check Plus which I blogged about a while ago. I still find the combination of the tool check and the Xiaomi/Wiha precision driver set covers most of my needs. However often I need longer tools to access fasteners in recessed pockets often when working on robots or drone projects. The Wera Kraftform Precision range are very nice tools and you can buy them in various curated sets, or, if you are like me, I buy them individually so I have the common sizes I need. Pictured above are my most used ones, the 1.5-2.5mm Hex drivers which are in pretty much daily use. The rotating caps move very smoothly and the tool tips are well made and durable with these showing very little wear after a fair bit of use. 

Tuesday, 3 August 2021

Tool Tuesday - Bicycle Spoke Key


This weeks #ToolTuesday is a classic tool for those interested in maintaining or repairing bicycle wheels. Inspired in part as I bought a fixer upper e-bike project and the rear wheel was in a bit of a state of disrepair! The humble spoke key, or "spoke wrench" for those over the pond, comes in a few variants but we'll look at the classic circular tool. Spokes on bike wheels serve an important purpose, they profile the strength and the load bearing system between the hub and the wheel rim and they also can be adjusted to "true" the wheel if the rim has a slight bend, dink or isn't quite centred. Tightening a spoke is usually achieved turning the "spoke nipple" at the rim end and a tightened spoke will pull the wheel hub slightly towards that point on the rim.

Occasionally spokes may work themselves a little loose. A tell tale sign is you might hear a spoke "pink" as you ride the bike indicating that, as it is passed over, the rim moves ever so slightly. You can check for loose spokes by strumming the spokes with a thumb or finger and detecting ones that create a lower note than the others. 

The spoke key has numerous options for different spoke sizes which are numbered around the tool perimeter and once you have found the correct size for your spoke nipple you can tighten and loosen the spokes like any nut and spanner. A word of caution though, you should only need to make very small adjustments (a 1/4 turn or so) for a loose spoke and if you are adjusting multiple spokes you should try and adjust opposing spokes in turn to keep the wheel rim centred. Wheel truing where you correct alignment issues is a real skill, you can learn it at home, but it's often good to find a local wheel expert who is sufficiently practiced in this dark art!