Saturday, 4 June 2022

Creality Ender 2 Pro 3D printer review.


I feel pretty lucky, I work hard and have to hustle but I get to work and write about stuff that I really enjoy and sometimes wonderful things happen! A couple of weeks ago I was discussing the new Creality Ender 2 Pro with @Woodpunk who had been a great advocate for the original Ender 2 as a cheap small from factor printer for farming. Particularly towards the end of their commercial life the Ender 2 was often to be found for under £100. Mr Woodpunk was considering getting the new ender 2 pro out of curiosity but in a fit of unbridled wonderfulness he decided instead to send me one to outsource the research to me!

So I see the Ender 2 Pro retailing in the UK at between £140 and £170 (the lower price being from technology outlet who I have bought off previously and had good service) and it arrives extremely well packaged with all tools and decent instructions for the pretty straight forward assembly. 


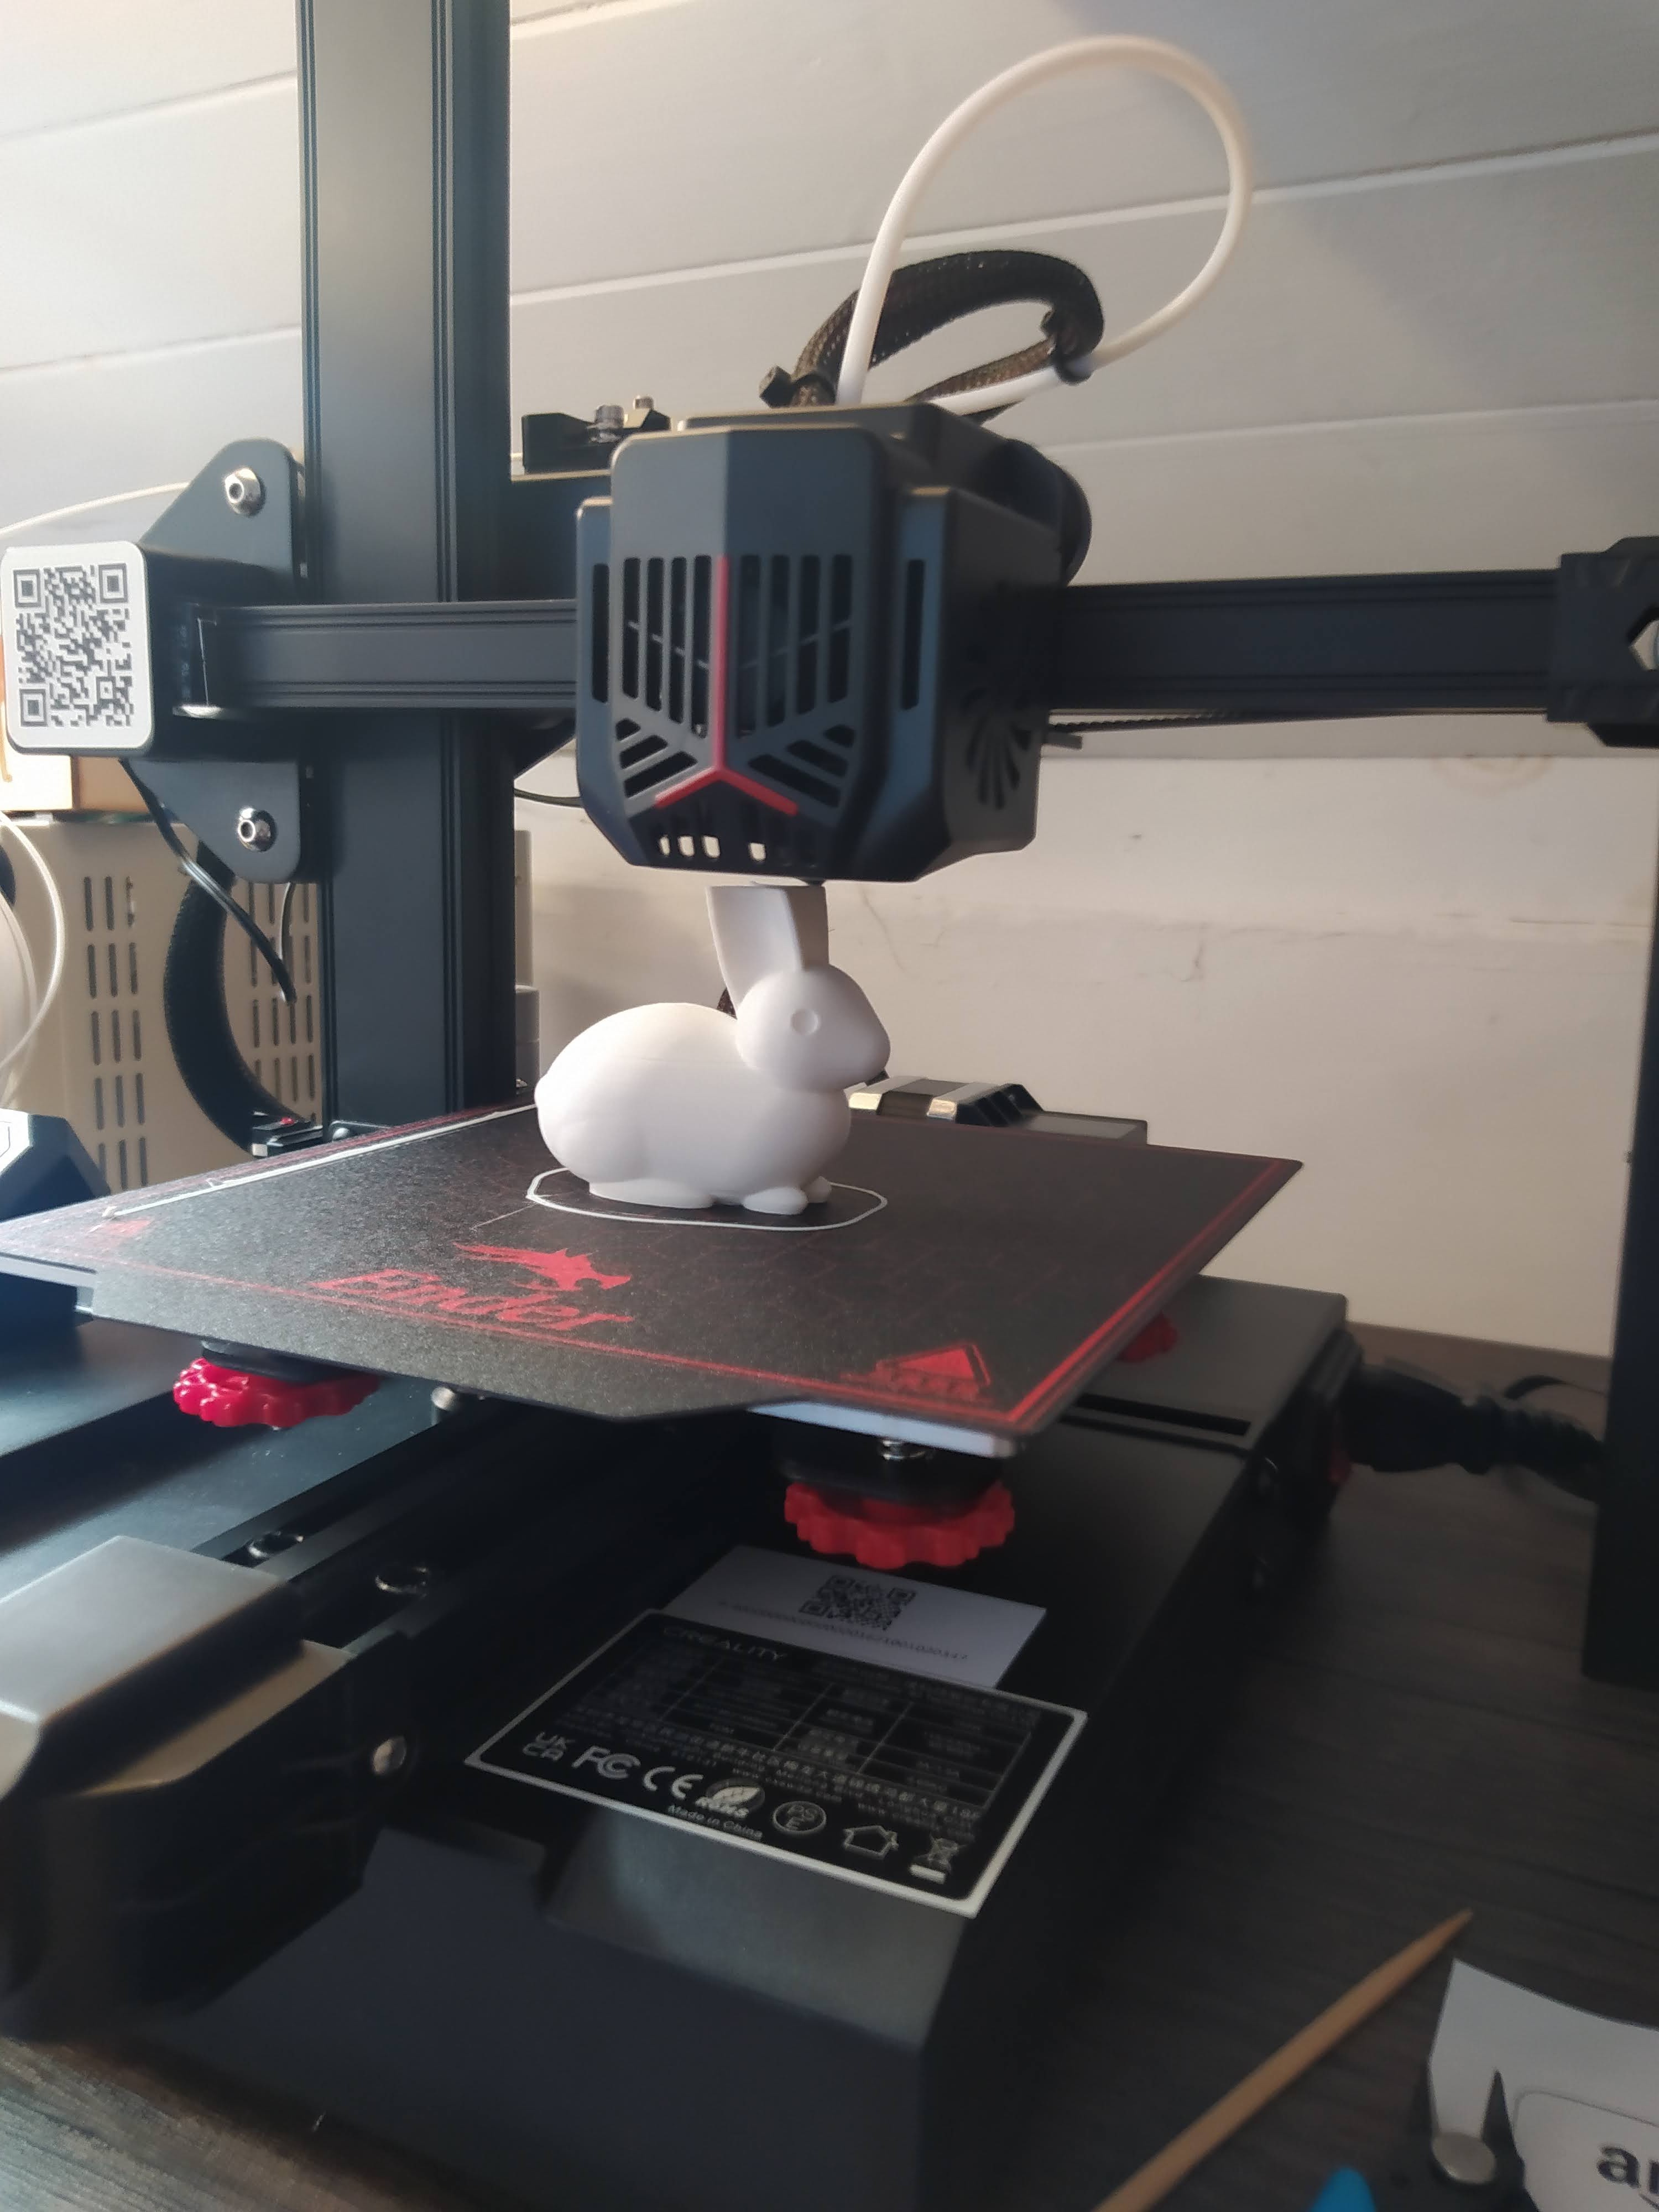
It went together in about 20 minutes and only really needed 7 bolts inserting and tightening up and a few well labelled cables connecting up. It's a smart looking unit with a carry handle on the top of the Z axis tower for portability and the rather nice filament spool holder rotates in and out for a stowed and deployed position. It does make it pretty small if you want to put it away and not have it permanently taking up desk space or if you need to carry it elsewhere. 

On this unit I found all the belts to be at a decent tension and all the vee wheels running smoothly with no play and it didn't need any tweaks mechanically apart from setting up and levelling the heated bed. I'm spoilt these days by my Prusa Mini + (which I reviewed in Hackspace Magazine Issue 53 ) which has the automatic bed probing and compensation but in a way setting up and levelling a print bed is a better solution as you aren't forcing a compensation in the build rather getting it right from the start! The bed has large turn wheels fitted and it's pretty straightforward to level using a piece of paper for a feeler gauge. Better than my first printer, the Wanhao I3 V2 you can see in the background which had no wheels fitted and where the first item I had to print! Whilst I could add a probe in the future, I only had to level the bed twice on setup after thermally cycling it and haven't had to tweak it so I doubt I would add one. 

I've LOVED the removable print surface on my Prusa, and it's great to see that budget end machines are starting to include this. The print surface on the Ender 2 Pro is very good in terms of print adhesion and release and it works very well. A minor gripe is that it's incredibly flexible and the magnetic bed grabs it a little well making it hard to line up before the bed grabs it, but really that's a tiny tiny concern. 


The LCD display clips on and is easy to read with a familiar Marlin firmware. Whilst again after using a prusa mini + with it's snazzy 32bit controller and hi res display this feels a little low tech it's absolutely fit for purpose, responsive and easy to read. 


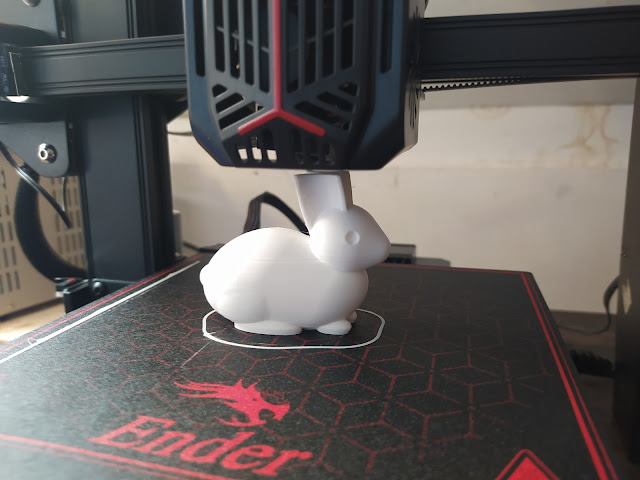
The included micro SD card has some documentation, some windows software and the obligatory example file gcode for printing. Loading up the sample creality PLA and setting it off it produced a very nice bunny model albeit with a noticable Z seam on the reverse side. Print quality was amazing though apart from that and it felt like a very good start. 

I haven't used the Cura profile provided for slicing as I am a fan of PrusaSlicer now and I was pleased to see that there is a beta configuration for the Ender 2 Pro included in the latest version. I tinkered with a few prints using the default settings of the PrusaSlicer ender 2 pro profile and initially had reasonable result but with constant blobbing/zits at new layer start points. The ender 2 pro is a bowden set up and it's quite a short bowden tube which means that there is quite a lot of pressure in the hot end. I knew I needed to up the retraction amount and speed but initially this seemed to make little difference. I was puzzled but began to suspect that the included SD card wasn't particularly quick and that the machine seemed to be making some longer pauses at layer change than I expected. I grabbed a better brand micro SD and tried again, this, combined with what seem astronomically high retraction distances (6-8mm) and near light speed retraction rates.. (200mm/s plus!) the blobbing and oozing was cured. So far it's had trials with a variety of PLA and some nice Prusament PETG as well as some cheap generic PETG. It's handled it all very well. 


In conclusion I'd say this is a great printer for the price, although there are a lot of great printers around the £140 to £200 mark these days. It is certainly capable of producing good prints straight out of the box and it has some nice support and user communities building around it already. I can only imagine making 2 changes to this machine. The first is, this is an incredibly quiet printer.. ruined by one fan in the power supply... honestly this is such a shame as the fans on the hotend and the steppers are incredibly quiet for a budget printer but the cheap fan in the integrated power supply is really loud, Creality really missed a trick there as an extra dollar or two on that fan component and people would be amazed how quiet this thing can print. Secondly, I don't like the fact that the top of the Z axis lead screw is floating... it seems like with all the handle assembly up there they could have popped a bearing in that could support the end of the screw. I can't say I've had any problems though with taller prints so it's only really an issue in my own mind! 

So there we go. It's an excellent printer. It's definitely going to get used and it's probably going to get abused with weird filaments and experiments as, at the price point, it's a great printer to not be too precious about. 


Monday, 16 May 2022

Things You Never Thought You'd Make - Flags!


I'm really lucky these days that I get to make lots of projects and even luckier that I've hustled and grafted to get myself in a position where I often get paid to do so. Occasionally I catch myself pondering and giggling about something I could never have imagined I'd end up making. Often these are small side projects that somehow relate or help another project along the way.  

A recent example is I've ended up making a flag and a slot together flagpole! "Why" I hear you cry. Well, I've been continuing to develop and test fly the EXOS swing wing rocket glider and I've been using a local site as a launch area. It's a swampy moorland known locally to our ragtag bunch of RC/Freeflight plane and rocket group as "The Swamp" and it's perfect, but quite featureless. I discovered the first time I set up a rocket launch rail there that as soon as you walk more than 10 meters from your launch spot, well, it disappears! A flag was needed, so I created a pole using 2 x 1m lengths of aluminium tubing and glued a 4mm brass tube into one end which means they can then slip into each other. The flag is simply a bit of rip stop nylon left over from a parachute project which I've sewn a small sleeve into which slides over the flagpole. Finished off with a heat transfer vinyl concretedog logo it's working well to get me back to my launch equipment after a long walk to recover a rocket! 

Tuesday, 15 February 2022

EXO-S The EXperimental Opensource Swingwing Rocket Glider.


I uploaded this video about the EXO-S Swingwing Rocket glider I've been designing and making. I need to get some decent weather to try and fly this! I'm hoping for a first flight test with the aim to get a transition from vertical mode to horizontal and expecting it to not be the best glide phase! The CG and wing load are pretty good so it should glide a little but it probably needs to shed a little weight and also needs the wings carving into a better aerofoil. Once tested and refined I'll put up some more video and post some build instructions. If you are curious the balsa parts and the 3d print CAD are published on this repo. https://github.com/concretedog/EXO-S-mk1

Sunday, 26 December 2021

Recycling 18650 cells into Useful Battery Packs


This has been on my todo list ever since I reviewed the Sunnko 709A spot welder machine in Hackspace Magazine issue number 48 and I finally got a bit of time to play this morning. Making battery packs from recycled 18650 cells, the cells commonly found in older end of life laptops and other devices, is nothing new and there are plenty of technical blog posts and youtube guides out there to explain the process. It appeals to me on a few levels, I like the recycling part but also it's handy to make some battery packs up that can be used to power FPVground equipment or even for use with my Pinecil soldering setup in the field. Of course it's also great practice perhaps for making 18650 packs with brand new cells which I may be tempted to do for long range drone or fixed wing projects as you can pack a lot more capacity into a smaller and lighter battery than a LiPo.   


I recovered these three cells from an old Sony laptop battery someone gave me and whilst I recovered 5 cells, I only wanted to build a 3 cell battery. I spent some time charging the cells to find that they were all serviceable and then made sure to charge these three cells so that their voltages matched pretty closely. This is useful when making a battery which you wish to balance charge as then it doesn't take an age in the first instance getting the pack to balance. The cells as recovered retained the little paper disks on the positive end which afford protection from shorts, It is good practice also to add extra insulation between the 18650 cells to protect from accidents and you can see in the above image I arranged the cells with some barley gasket paper between them. Whilst many people use a jig to hold the cells and then the pack covering to reinforce them, I decided a few spots of hot glue make for a robust structure.  


Next up I cut some nickel strips to make the connections and then spot welded them using the Sunnko machine. For the strips that connect the cells I simply made straight cuts but for the positive and negative terminals I wanted to make tabs with smoothed edges to solder to to avoid them snagging or cutting any insulation or wiring. The spot welder can create really nice joints and it's great to be able to avoid soldering directly to the cells as it puts a heap of heat into them and isn't massively safe.


All that remained was to solder up an XT60  battery connector and also a balance connector and associated wiring.  I made up my own balance connector using a JST XH connector and it's relatively straightforward to wire up, soldering to the new spot welded tags in between the adjoined cells, again, with some decent flux and a hot iron it's much easier to avoid putting too much heat into the pack. Finally a good dose of sanity checking and triple checking with the multimeter that everything is connected correctly and it's happily charging correctly. I've just used some Kapton tape to insulate the pack and hold the wiring in place, a more common approach is to find some large heatshrink which is on the list to pick up at some point. As I'm not too worried about the weight or the ascetics I am tempted to just give it a good wrap of PVC tape. 

Tuesday, 14 December 2021

Tool Tuesday - Wire Brush

This is a tool that perhaps shows my predilection for rusty projects! The wire brush is an excellent tool for loosening and removing rust or loose surfaces. It's a tool that gets a lot of use on my collection of scruffy vehicles but also has been used to remove flaky masonry paint and more. It's not a refined tool and I tend to go for the budget end if possible as they are almost by definition destined to be abused. 

Friday, 26 November 2021

Bonus content! - Hackspace Magazine Lockpicking Articles


I've recently written a 2 part article in Hackspace Magazine about locksport and lockpicking, the first part (issue 48) covers the basics around lockpicking practice and essential stuff such as the golden rules, never pick a lock you don't own and never pick a lock you depend on. The second part (issue 49) looks at DIY lockpicking/locksport tools where we made some picks, tension tools and a practice board. Occasionally when I am writing this type of piece I have to edit out sections to meet the word count requirements of the article, in this instance I culled a section on how to re-pin a lock. I'm posting it here as it's a really useful skill that can mean you need fewer practice locks and can get multiple setups/pinnings per lock. 

Re-pinning a lock is a useful skill that can enable you to create a new challenge out of an existing lock that you have got used to picking. Essentially you are removing the centre core of the lock and removing the pins and replacing them to make the lock a different challenge. A standard 5 or 6 pin tumbler lock has the core of the lock retained with a C clip in a machined groove and this can be removed with a pair of pliers. Once you have removed the clip, be careful to not pull out the lock core until you are ready as all the pins will fly out and potentially get lost. You can’t remove the core until the lock is in the unlocked state. If your lock currently has a key that fits you can insert the key and then unlock the lock, but only turn the key an eight of a turn. With the key turned rotate the whole lock assembly so that the key is now vertical such that if you removed (but don’t do this yet) the core the key pins would remain sat in the now vertical channels in the core. A plug follower is a dowel, or indeed a 3D print in our case, that matches the diameter of the lock core. These are quite commonly half an inch in diameter. The plug follower allows you to remove the lock core without releasing all the pins at once. Whilst removing the lock core hold the plug follower flush with the far end of the core and feed it in as you move the core out. If all has gone well you now have the lock core, with the key inserted, and all the key pins still in the holes and you have the lock body with the springs and driver pins still in each channel hole block by the plug follower. Cover the end of the lock or place it flush onto a table top and then slowly retract the plug follower from the other end. You should hear each driver pin and spring release and once the plug follower is out you can lift the lock body and find all the springs and driver pins safely on your work surface. Re-pinning the lock reverses this process. Note that if you swap the key pins to different locations, making a new challenge from the same lock, your key will no longer fit or operate this lock. You can, of course, pick the lock into an open position and re-pin it back to work with the key.


To re-pin the lock place the plug follower at the back of the lock and with a pair of tweezers carefully place a spring into the hole furthest into the lock, next grab your driver pin with the tweezers and place that pin over the spring and push it until it is slightly seated into the hole. Next push the plug follower into the side of the driver pin, you should be able to trap the driver pin, binding it on the hole edge and then use your tweezers to push the pin fully down into the hole, you can then slide the plug follower over that pin to secure it and move on to repeat the process for the next pin. Finally once all the driver pins are replaced you can place the core, containing the key pins, back into position, lock the lock by rotating the core and then re attach the retaining C clip.


Tuesday, 9 November 2021

Tool Tuesday - Bahco Hacksaw


The dedicated reader might have noticed that Tool Tuesday has been quieter of late. I decided that I would move from every Tuesday to a more relaxed every now and again approach, hopefully equating to around one Tool Tuesday a month. The idea being then I also do more blogging on personal projects.... well never say never!

Anyway today's Tool Tuesday is this excellent Bahco hacksaw. Whilst a great step up from a no brand cheap hacksaw, this Bahco sits firmly in the middle ground and is available for around £12-16. It's a very nice frame and handle, comfortable in hand and the blade tension bolt and handle are excellent. The black moulding on the far end works well for a guiding hand and some pressure application and as such it returns very accurate cuts. What really makes this hacksaw shine though in my humble opinion are the Bahco Sandflex Bi metal blades. I've yet to break one and they seem to last a very long time. Mine is due a new blade but I can't remember the last time I opened my spare blade pack to replace one which tells me all I need to know.